A Cut Too Deep, Part 2

22 Nov

My MacGyver skills came in handy when it came to rescuing the Whale with the broken tail. Given a second chance to be completed and not abandoned, it would have a whole tail section transplant instead of an itty-bitty prosthetic!

This was what I did…

After evaluating the damage and the wood surface, an itty bitty prosthetic tail wouldn’t do because that part of the wood was too porous and it certainly won’t stick. It needed more to be permanent and a transplant was a better option to replace the whole section. A little bit more work but I felt better about this direction.

So I worked on another piece for the tail part. Luckily the Meranti piece that I chose wasn’t that hard and it was quite effortless to get the shape right quickly. But after aligning the pieces, my estimates were off! Haish… it didn’t look right and I ended up having to shave off a little bit more of the bottom part on the main body.

img_6184-1

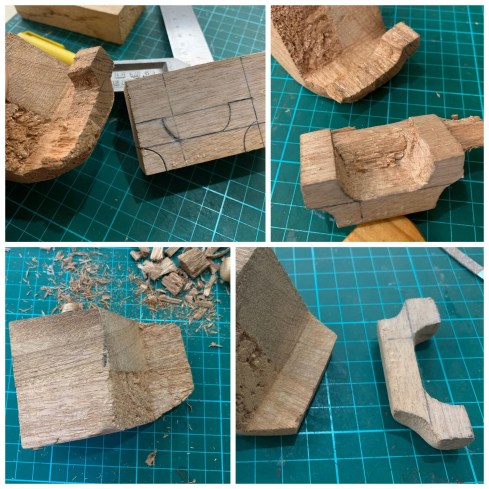
Bottom pics: Before (L) and after (R) trimming the base to fit the new tail section

Eventually, with the tiniest nails I could find, the tail section was attached to the main body. I then added Elmer’s glue and stapled the section to secure it.

img_6189

How to add a tail to a whale, with nails, glue and staples

After the glue dried, I started puttying the piece to even out the nooks and crannies and the Whale was starting to look good. Phew! I decided to leave the staples in for peace of mind.

img_6254-1

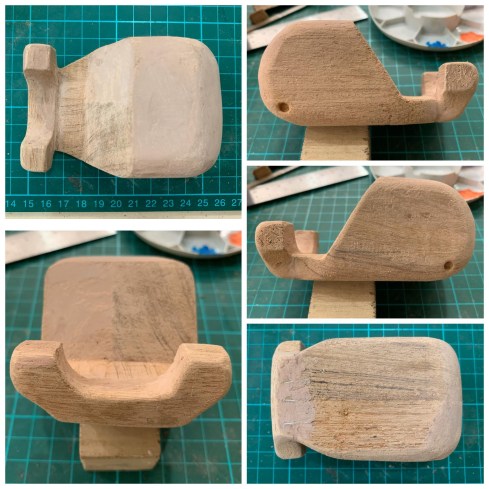
A saved whale is a happy whale!

When I’m done applying gesso on it, you can’t tell that this fella had surgery in the first place. And once I decide what color it shall be, it will certainly look good when painted. I’m so glad I persevered on this to give it a second lease in life after that unfortunate cut that was too deep. A saved whale is a happy whale, and a happy me too!

A Cut Too Deep

19 Nov

After completing Ginormous Gnome the Second, I moved to carving a Whale. Somehow for this piece, I had reservations when I started but I did not take heed. The two pieces of Meranti were different – one was too hard and the other too soft. I don’t know what I was thinking when I glued them together. I decided to go ahead to carve out the usual.

It wasn’t easy because one side being so soft, created a lot of craters when I worked on it. I didn’t even exert any strength and it would break. But the other side being so hard, I had no choice but to exert strength and this inadvertently hurt my elbow. Sigh… and I didn’t want to abandon the piece, so I ploughed on.

And then this happened – the tail broke off… Arrrghhhh!!!! I was aghast! What have I done?

img_6159

The soft, the hard and the broken…

The piece was on lying on the softer side when I was shaping the harder side of the tail. But it was a cut too deep and the pressure broke the softer side of the tail.

Instead of abandoning the piece by now, which I was still reluctant, I thought a little prosthetic tail can perhaps save the piece. I felt that I have put in so much effort up till now, I didn’t want to give up.

How to salvage this fella? I had to plan and devise a rescue mission.

Here’s Ginormous the Second!

18 Nov
img_6291

Ginormous the Second looks better from the side than the front

I’ve finally gotten around to painting up Ginormous Gnome the Second. And I must say it does look good especially from its side profile. Compared to Ginormous the First, the difference in body width is very obvious. I think if I have two blocks of the exact same size, both pieces would still come out slightly different.

As every piece is hand-carved, there’s bound to be some variation, subtle or obvious that gives each piece their unique character. The end result of both looking the same is only in terms of the overall shape and colors.

I’m pleased that the second piece turned out good and preparations are underway to start the next gnome soon.

img_6292

Side by side, Ginormous 1 and 2 are very different in size!

The End of the Road?

15 Nov

Last Saturday at 5.30pm, my iPad Mini – a first gen unit and still on iOS9.3.5 (because it cannot update any further) suddenly died despite having about 50 percent of battery life left. It just went flat when I tried to turn it on. Zero power, nada, zilch, empty…

Within two days, this faithful device of mine pulled this stunt twice – drained to the core without any activity despite having battery life to spare. It has never done this before, so I don’t know why this happened. I’ve had it for seven years and that’s a long time.

I plugged it in to charge (and yes I did turn on the power) but it didn’t seem to respond. Oh dear… I hope it can be revived.

img_6209

So now I am sort of iPad-less and I can’t decide if I want to buy a replacement. Then again do I actually need one? As the iOS keeps updating and newer devices flood the market each year, my poor old device can’t keep up and has been left behind.

It’s always quitting unexpectedly on me when I am in the thick of a strategic move especially Candy Crush Soda or it’s spinning endlessly when I try to read the news on Safari. And apps like Skype and Netflix cannot be used anymore because they no longer support older devices.

So I’ve stopped bringing my iPad Mini to the office because of these issues. The performance or lack of it has been very glaring compared to my iPhone XR which serves me well for all my needs.

But I just hope the unfortunate power issue was just a one (or should I say two)-off occurrence and won’t be repeated. I’d have to monitor and hope it’s not the end of the road for my iPad Mini.

A New Direction, Part 2

12 Nov

The efforts on Ginormous Gnome the second has been coming along fine. My only problem with it was its width – a wee bit skinny. It actually looks fine from the side profile angle but from the front, a tad too thin.

img_6083

The nose job was tough!

img_6078

Putty added to smoothen the surface throughout

The nose was the biggest challenge for this piece despite it being one piece unlike Ginormous One, which had an add-on. And since the overall body was rather skinny from the front, the big nose had to be shaved down to be proportionate to the body.

A lot of work but at the end, I’m pleased with the result. Once it’s painted up, another excellent Gnome to be displayed with the rest. Or I could give this fella away? Hmm…

img_6125-1

Looking good from the side with gesso applied as base before painting it up!


Looks like there may be more giant Gnomes coming up considering I have recently gotten new supplies of wood. Yay!

In Memory of…

11 Nov

Today would have been official pet number one’s 12th birthday. Sniffle…

It’s been a month since Rooney’s passing. How time flies! There are days when we get home, I find myself looking out for him expecting a patch of fur lying at the garden terrace when I open the front door. But he’s not there….

We have been keeping busy so that we don’t think too much of the loss. The house has been rather quiet sans the barking or the act of talking to a pet who was literally our third child, our baby. To overcome this, I find myself playing music more often than ever on my iPhone XR. Sometimes I would up the volume on Spotify’s choices for me or simply blast my Music’s playlist so that it’s not so quiet. Sigh…

Happy birthday Roo, you’re in a better place but always in our thoughts and hearts.

A New Direction

8 Nov

After the bout of carving six Citizens not too long ago, I was ready for another big piece. Suddenly carving big pieces is the way to go! This latest attempt at another Ginormous Gnome is again a combination of three Meranti wood, making it the second piece with three glued pieces.

This time there’s no add-ons for depth, learning from the previous piece. Also I am unfazed by the height because I know what to do. And there certainly won’t be any hole in the cap because I sketched the Gnome to be smaller with plenty of room to shape.

img_5641

Let the carving begin!

These days I seem to prefer carving big pieces over little Gnomes as it does not aggravate the left wrist because I don’t need to have a dead grip with the left hand. If you must know, carving Citizens is not painful because it’s on soft balsa, not semi-hard Meranti wood.

But I still have to find the right balance with this new direction because at times, the right golf elbow can still be aggravated if I’m at it too long – the repetitive motion on the semi-hard Meranti.

Sometimes if I have a weekend game coming up, I’d carve less to prevent any recurrence of pain. However if the pain persist on game day, I have no choice but to pop painkillers and use Salonpas patches to subdue it.

Perhaps with the new lighter golf set making golf enjoyable again, I can find the middle ground to have satisfaction to enjoy both golf and carving simultaneously without giving up one or the other.

I’ll see how, until then onwards with the new piece!

img_6081

Slowly but surely it’s coming along!

A Timely Change

5 Nov

I changed my golf set recently! It was a decision made after mulling over it for months. Prior to this, I felt I couldn’t improve my game anymore especially with the recurring injuries and change wouldn’t help anyway. Why change when playing better golf was also not at the top of my priority anymore?

Factor in my desire to carve and I was at it constantly, golf was no longer my focus. But constant carving came with a price – aggravated pain on the right elbow whenever I did a little bit more than necessary. And when there’s pain, it affects the golf; and if playing good golf was out of the question with the recurring problem, why bother to change? I was at it in circles for months.

But a good deal came along and I caved.

img_6155

My new set… here’s to playing better golf!!!

So I gave up my TaylorMade RBZ irons, Maruman Conductor driver and wedge, Cleveland woods, hybrid and wedge for a lighter pre-owned Srixon XXIO MP900 set to replace them. The only thing I kept was my Scotty Cameron Squareback putter. Less clubs in the bag, 10 instead of 14, this made my approach on the game changed too. But for the better. Also the lesser clubs means a lighter load and we’ve been walking nine-holes carrying our golf sets instead of using the golf trolleys the last three weeks. Very good exercise as I find myself sweating buckets each time.

img_6158

The old set, thanks for the good times!

It took me a few games to adjust my swing to the new clubs and know the distances. The new driver however, loses to my previous driver’s performance but that is only because I have had the Conductor for years and have been so in-tuned with its ability. It’s just a matter of time before I am able to master the new driver to maximize its performance. After all, every new piece of equipment will require time to get used to them, some just take longer than others. So I’m not worried.

Overall, all the clubs feel good and even with some nagging pain on the right elbow, I am striking the ball better and further. This means I can still carve but with care of course. A win-win situation nonetheless. I love the new 3-wood as it’s giving me the distance I couldn’t get previously.

It didn’t take me long to master the new Sand wedge for my short game though. With just one club to use for the 50 meter (or less) range instead of the three choices I had previously – the Approach, 52˚ or 56˚ wedges, being indecisive on what to use has suddenly been taken out of the situation, making the approach so much easier. And I must say it has been super accurate, cutting down strokes to get on the green and pretty close to the flagstick. A real confidence booster to come back with better scores. I love it!

And this was evident when I played in my Club’s November Monthly Medal bogey-play tournament over the weekend; I came out tops in the Ladies category! Woo hoo…. however due to the low turn out of just six ladies (a minimum of eight participants was required for the winner to receive a trophy), I was an ‘unofficial’ winner without the showpiece. It’s okay, I’ll take it as is and am glad I made this timely change. I just hope it won’t be a one-time wonder and definitely looking forward to playing better golf from here on.

One Problem Resolved

4 Nov

I’m glad to say that the plantar fasciitis that I was experiencing several months back has disappeared. How did I do it? Well, I certainly didn’t walk any less, in fact, I walk more but with an arch support for the shoes. And this helped.

After the problem disappeared, I bought a new pair of Skechers with good memory foam for better support. Being new and spongy, it’s certainly doing its job so the additional arches are not required anymore, at least for this new pair. But I still use them for my golf shoes. And after a round of 18-holes, the feet are fine without issues.

The old pair of Skechers has been quite worn down, maybe that’s why the insole arch support was necessary when the problem came about. And thank goodness the problem is resolved and not escalated further. I have enough challenges as it is with my endometriosis and the golf elbow that has been acting up.

At the end of the day, it’s all about taking care of ourselves, being at this dinosaur age, you just can’t wing it to get by.

img_5444

Is That a Nose Dinky?

1 Nov

I didn’t realise Dinky my dinosaur ‘grew’ a nose! From the looks of it, it’s a teeny-weeny scab from a scratch of an insect bite. And because of its strategic placement on Dinky’s face, it can pass off as a nose. Hahahaha…

However, I don’t think it’s a mosquito bite because I don’t remember any itch or even scratching my leg. Or maybe there was and I did… I don’t remember. Dinosaurs can be forgetful.

I just thought it’s funny that my Dinky now has a nose, a glowing red one just like Rudolph! Rather cute, no?

img_6112