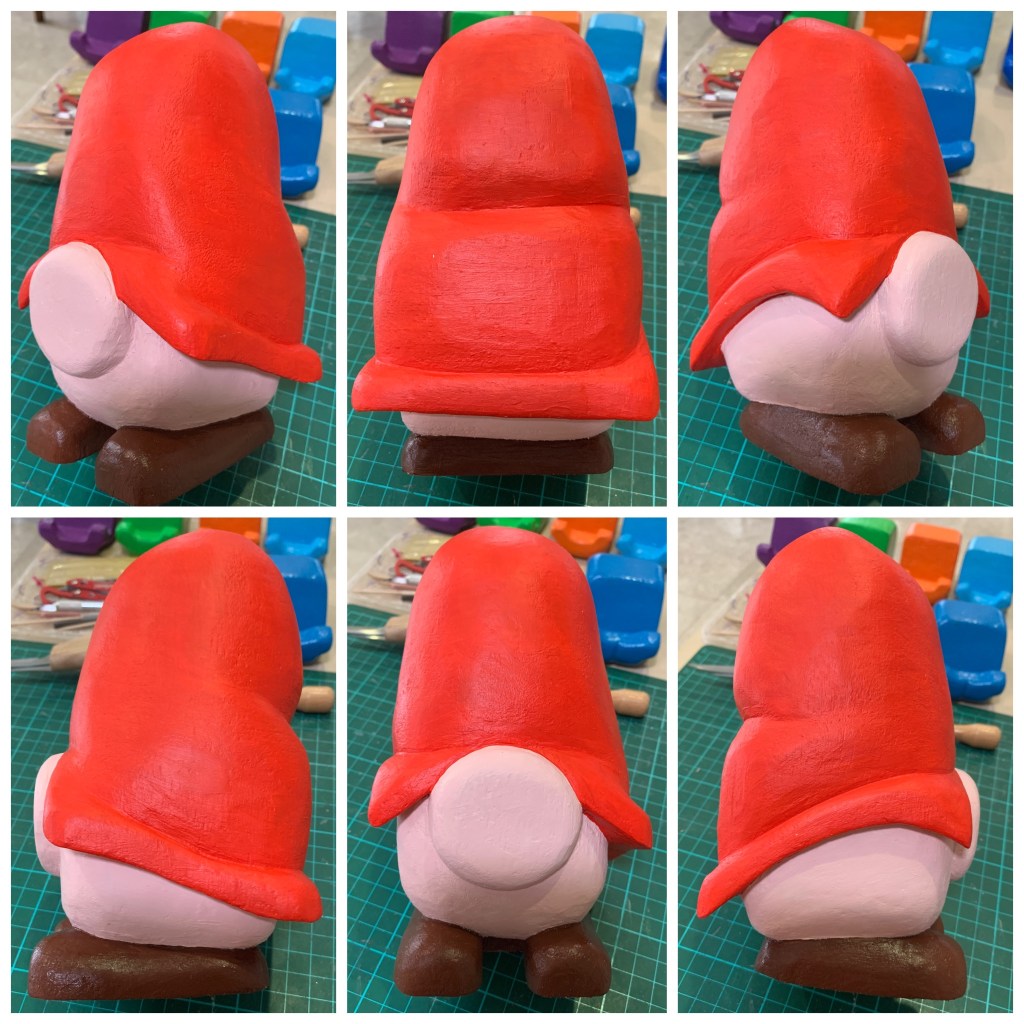
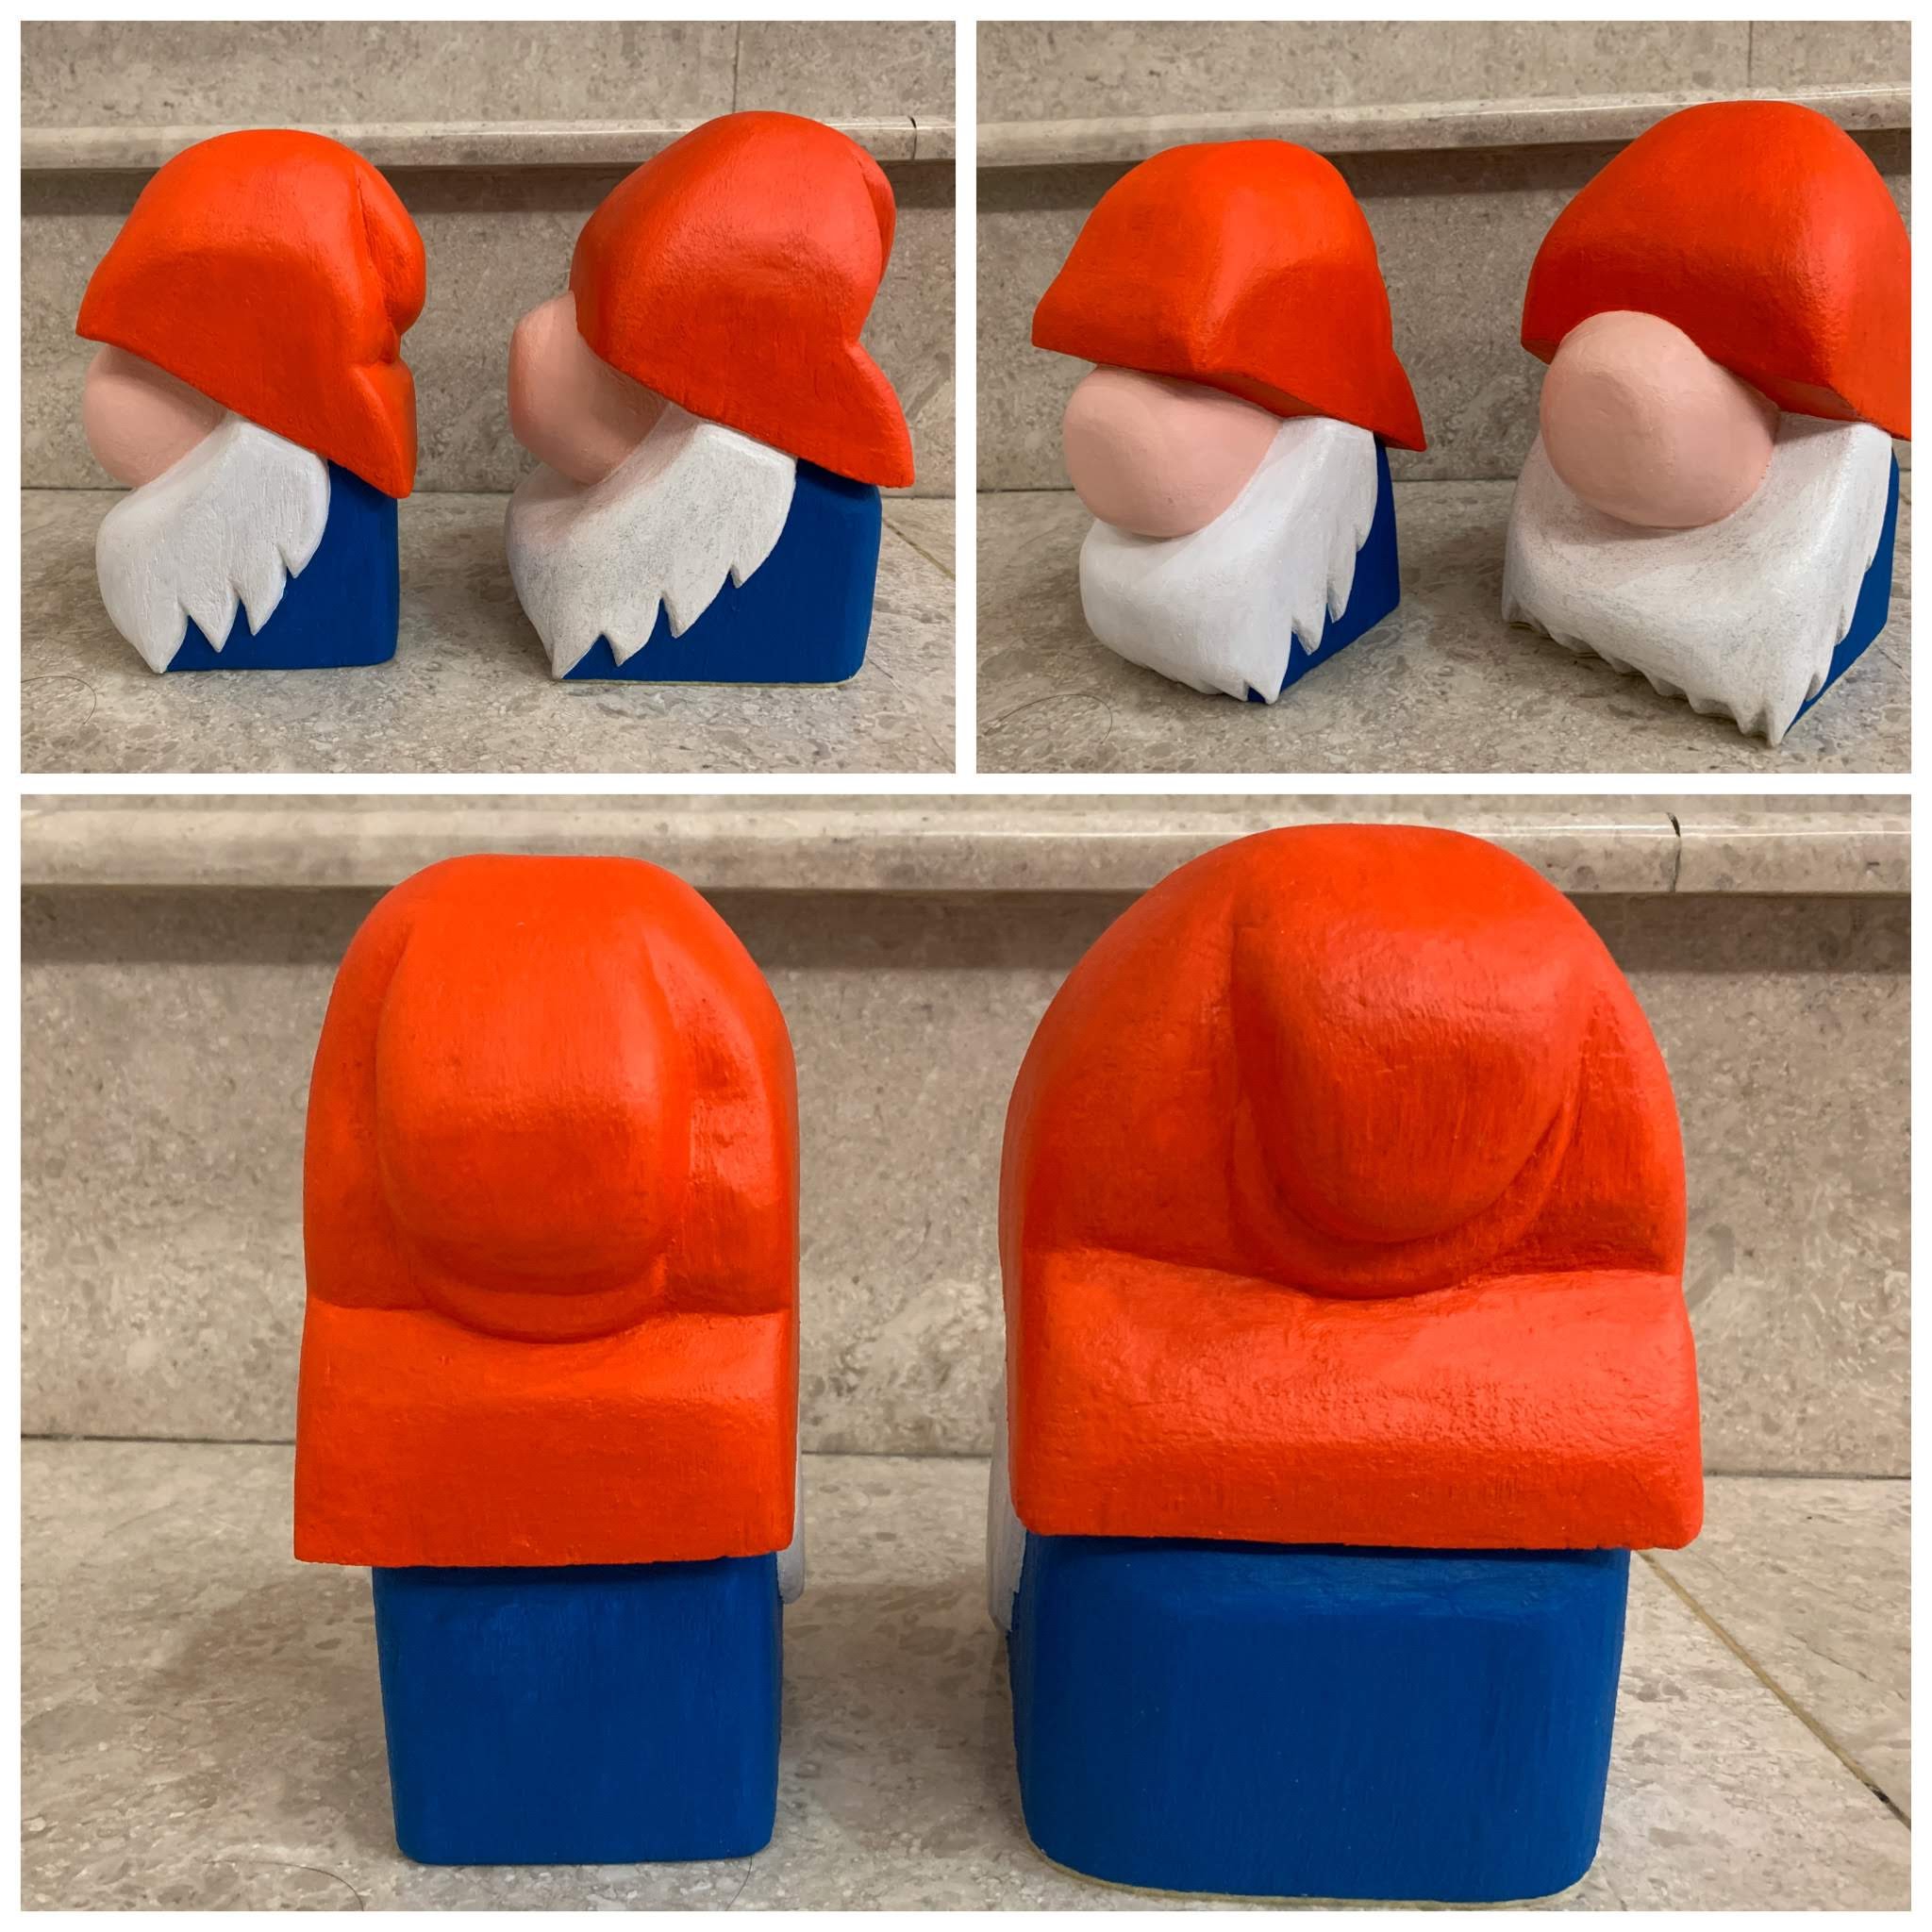
I took quite sometime to finish the latest Gnome because cooking and cleaning comes first over carving. And when I finally painted it up, it is an odd one.
Same same but different
Certainly a breakaway from the troop, it does not have the blue top or white shoes although it has the red cap like the rest. Well, it’s okay. Sometimes variation is good to make things interesting and also helps to improvise for the better.
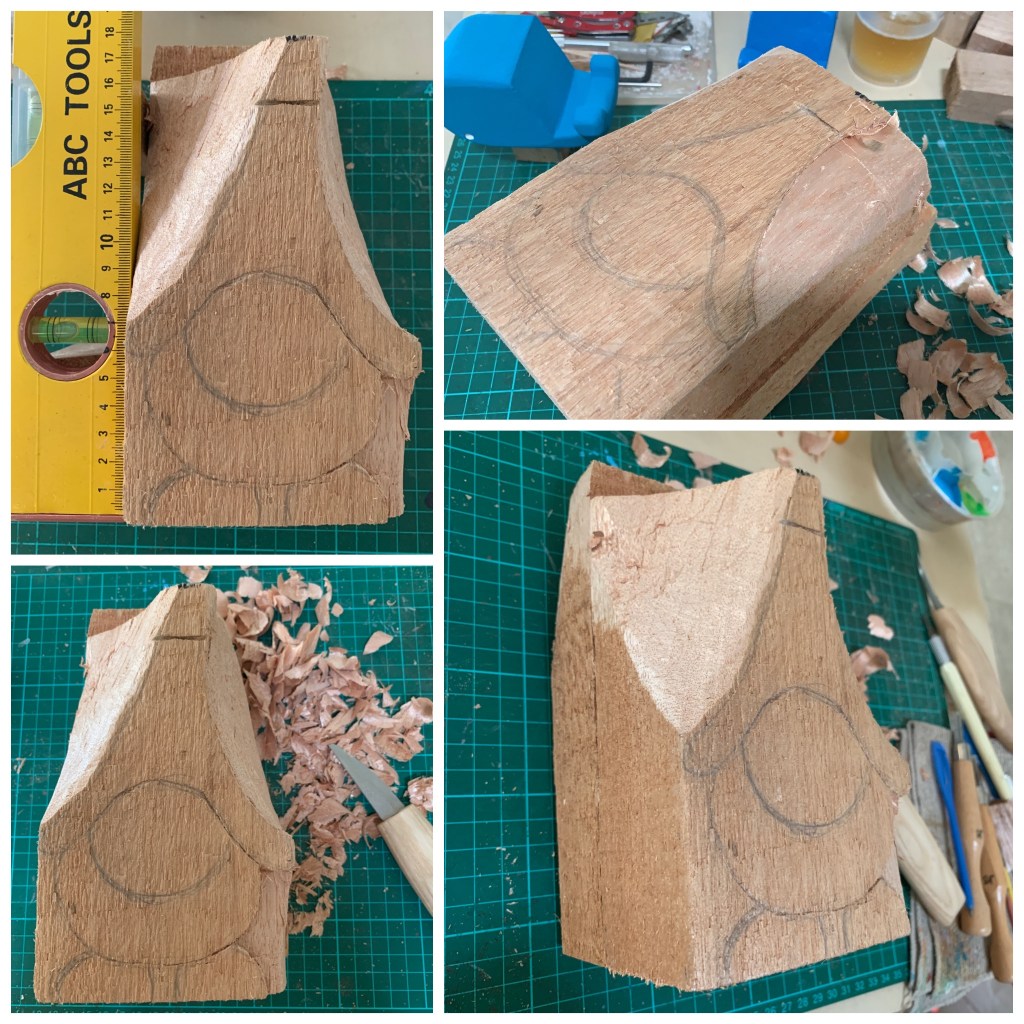
However, when a piece in hand is not following a systematic way to carve, like carving the Whale pieces for example, the task in hand becomes challenging. And ginormous Gnome, at the height of 17.5cm was certainly a tough challenge.
One tough cookie… err, Gnome to carve
Well it’s almost completed (the varnishing being the final process), I am now contemplating what my next piece should be. Hmm…
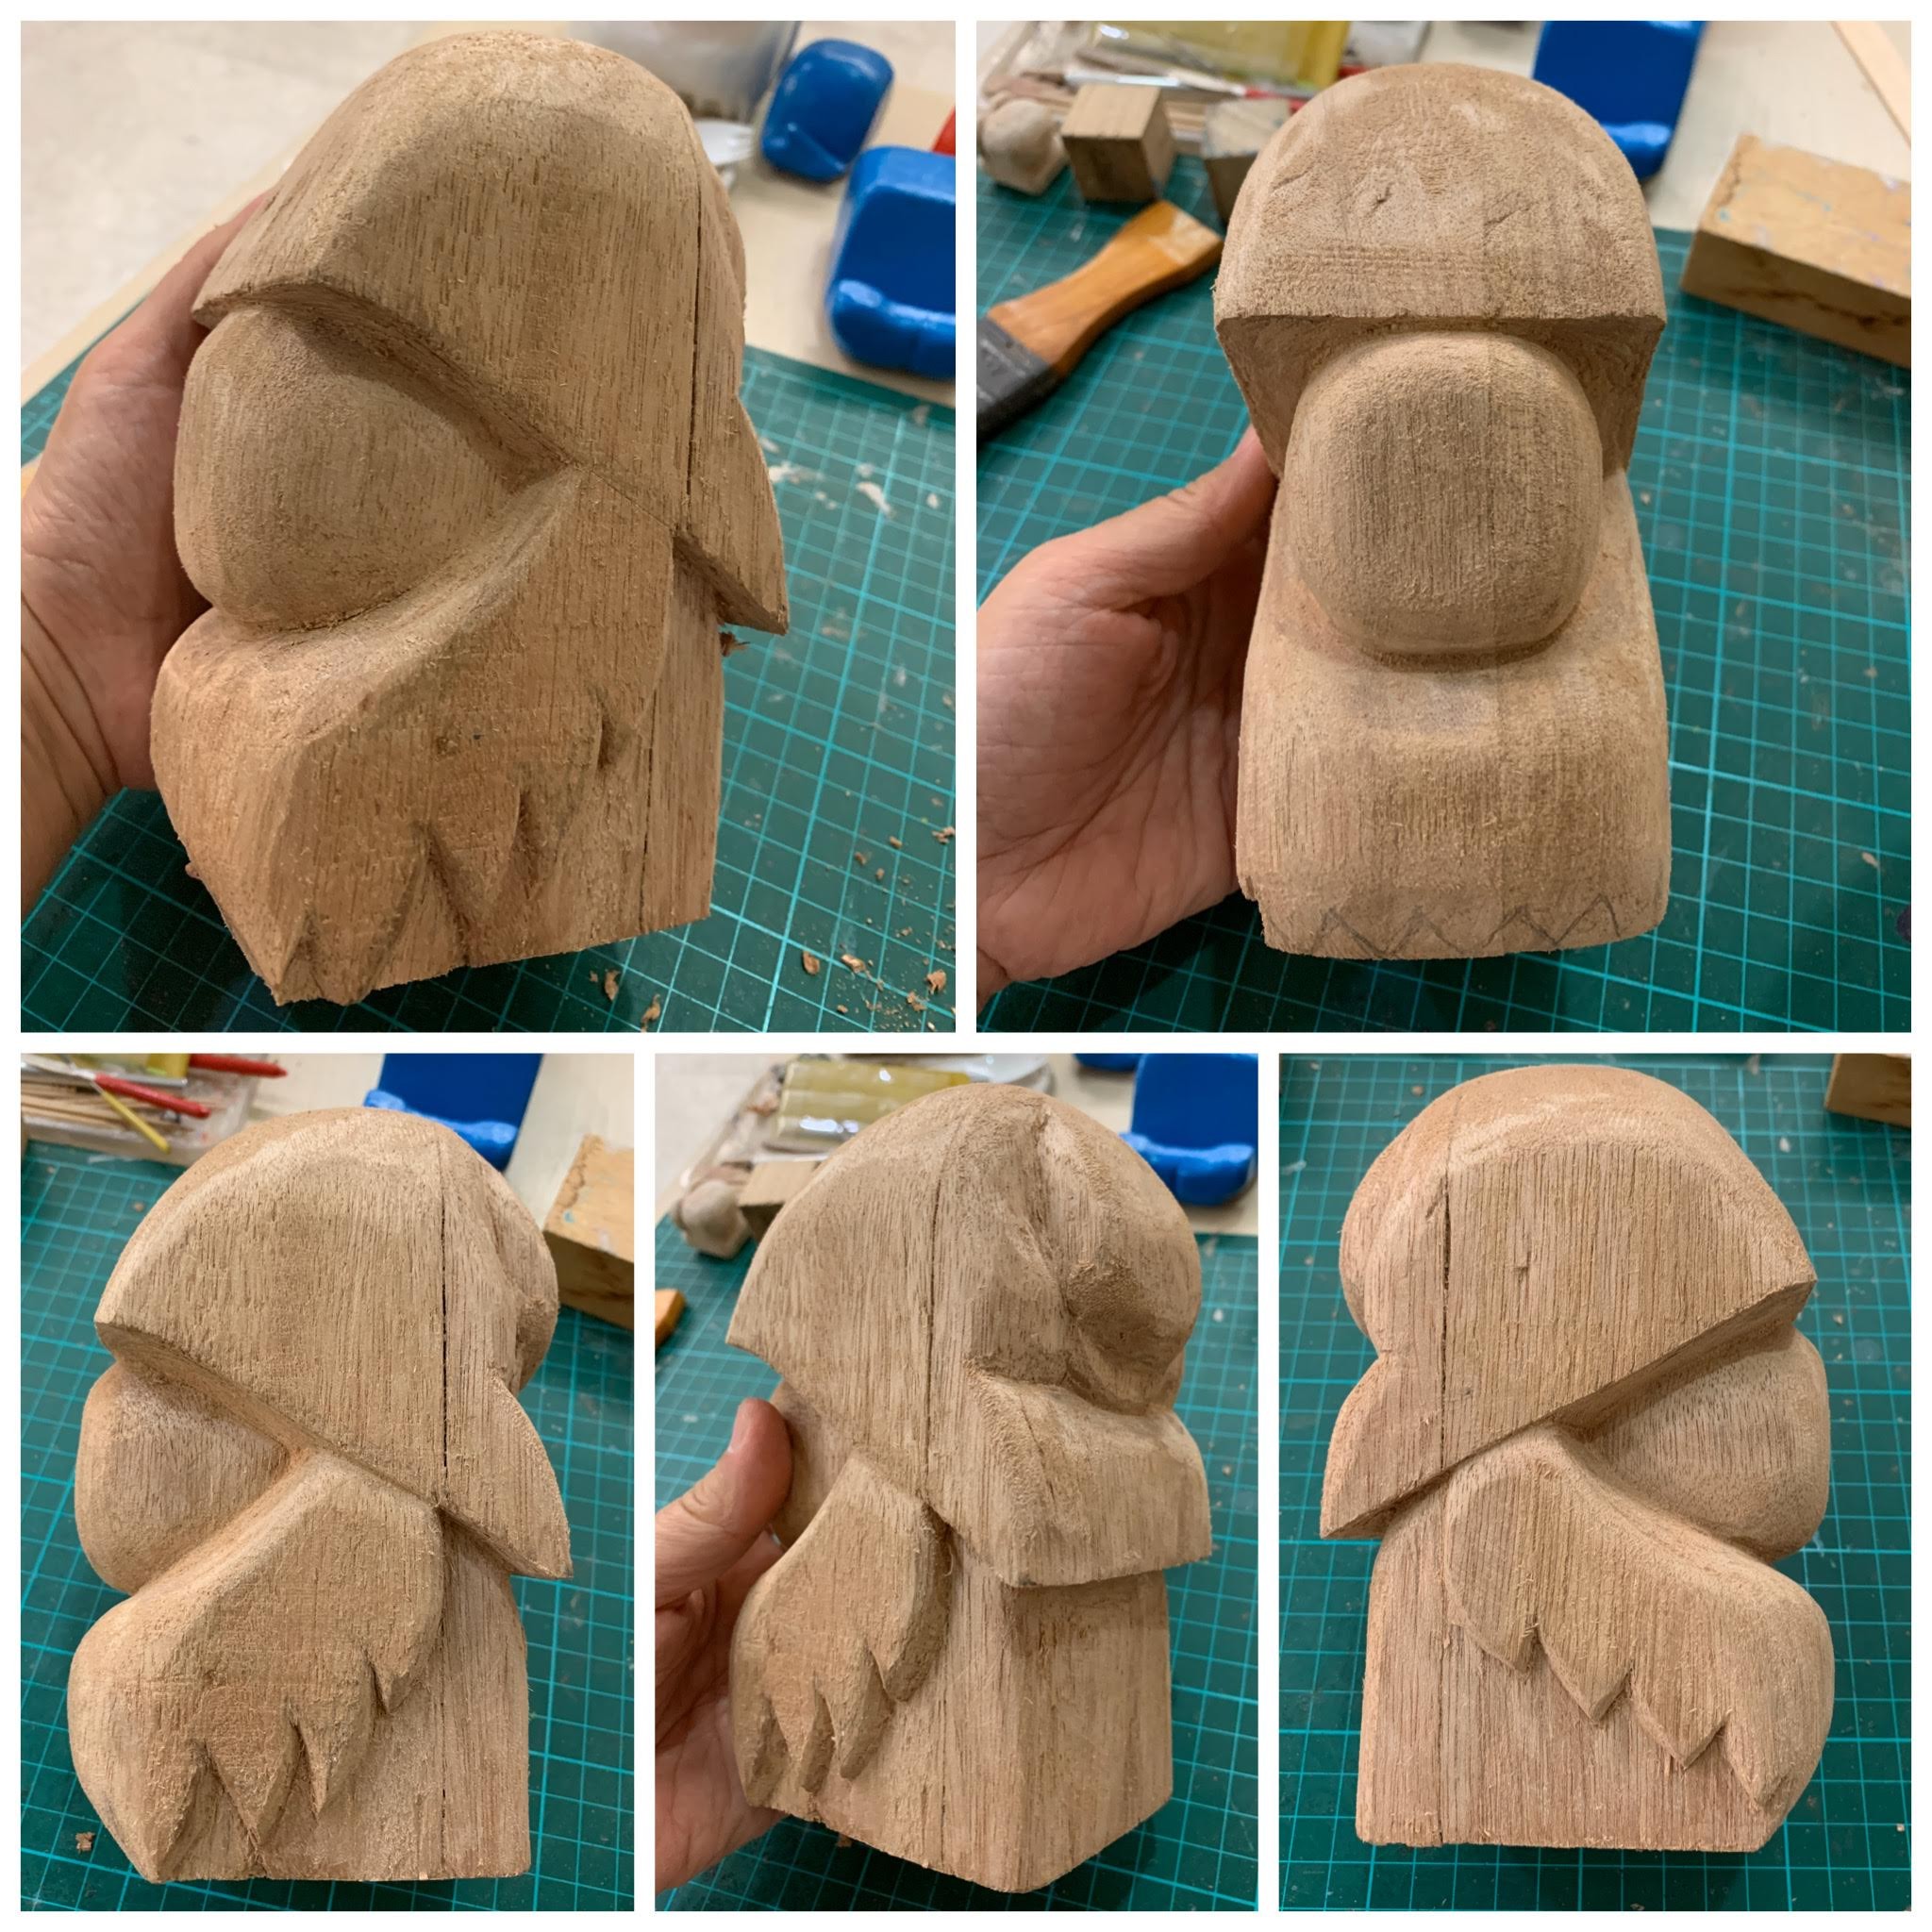
The latest ginormous Gnome is a ginormous challenge. The balance was off and so much effort has gone into it already. Obviously I did not want to waste the piece and decided to reshape things to save it.
It’s coming along
Days when I have the chance to carve, I’d be focused instead of planning on what to cook for hubby and M2. And this worked out.
Originally, I shaved off too much of the shoes and it wasn’t stable on its feet literally. Hence some patch work was needed to increase the footprint and this decision turned out well.
The cap was problematic from the beginning and I stressed over this. So I filed it, vigorously if I may add to shape the overall to look like what it is now. As best as I tried, it is still lop-sided. This fella certainly wears his cap differently from the rest.
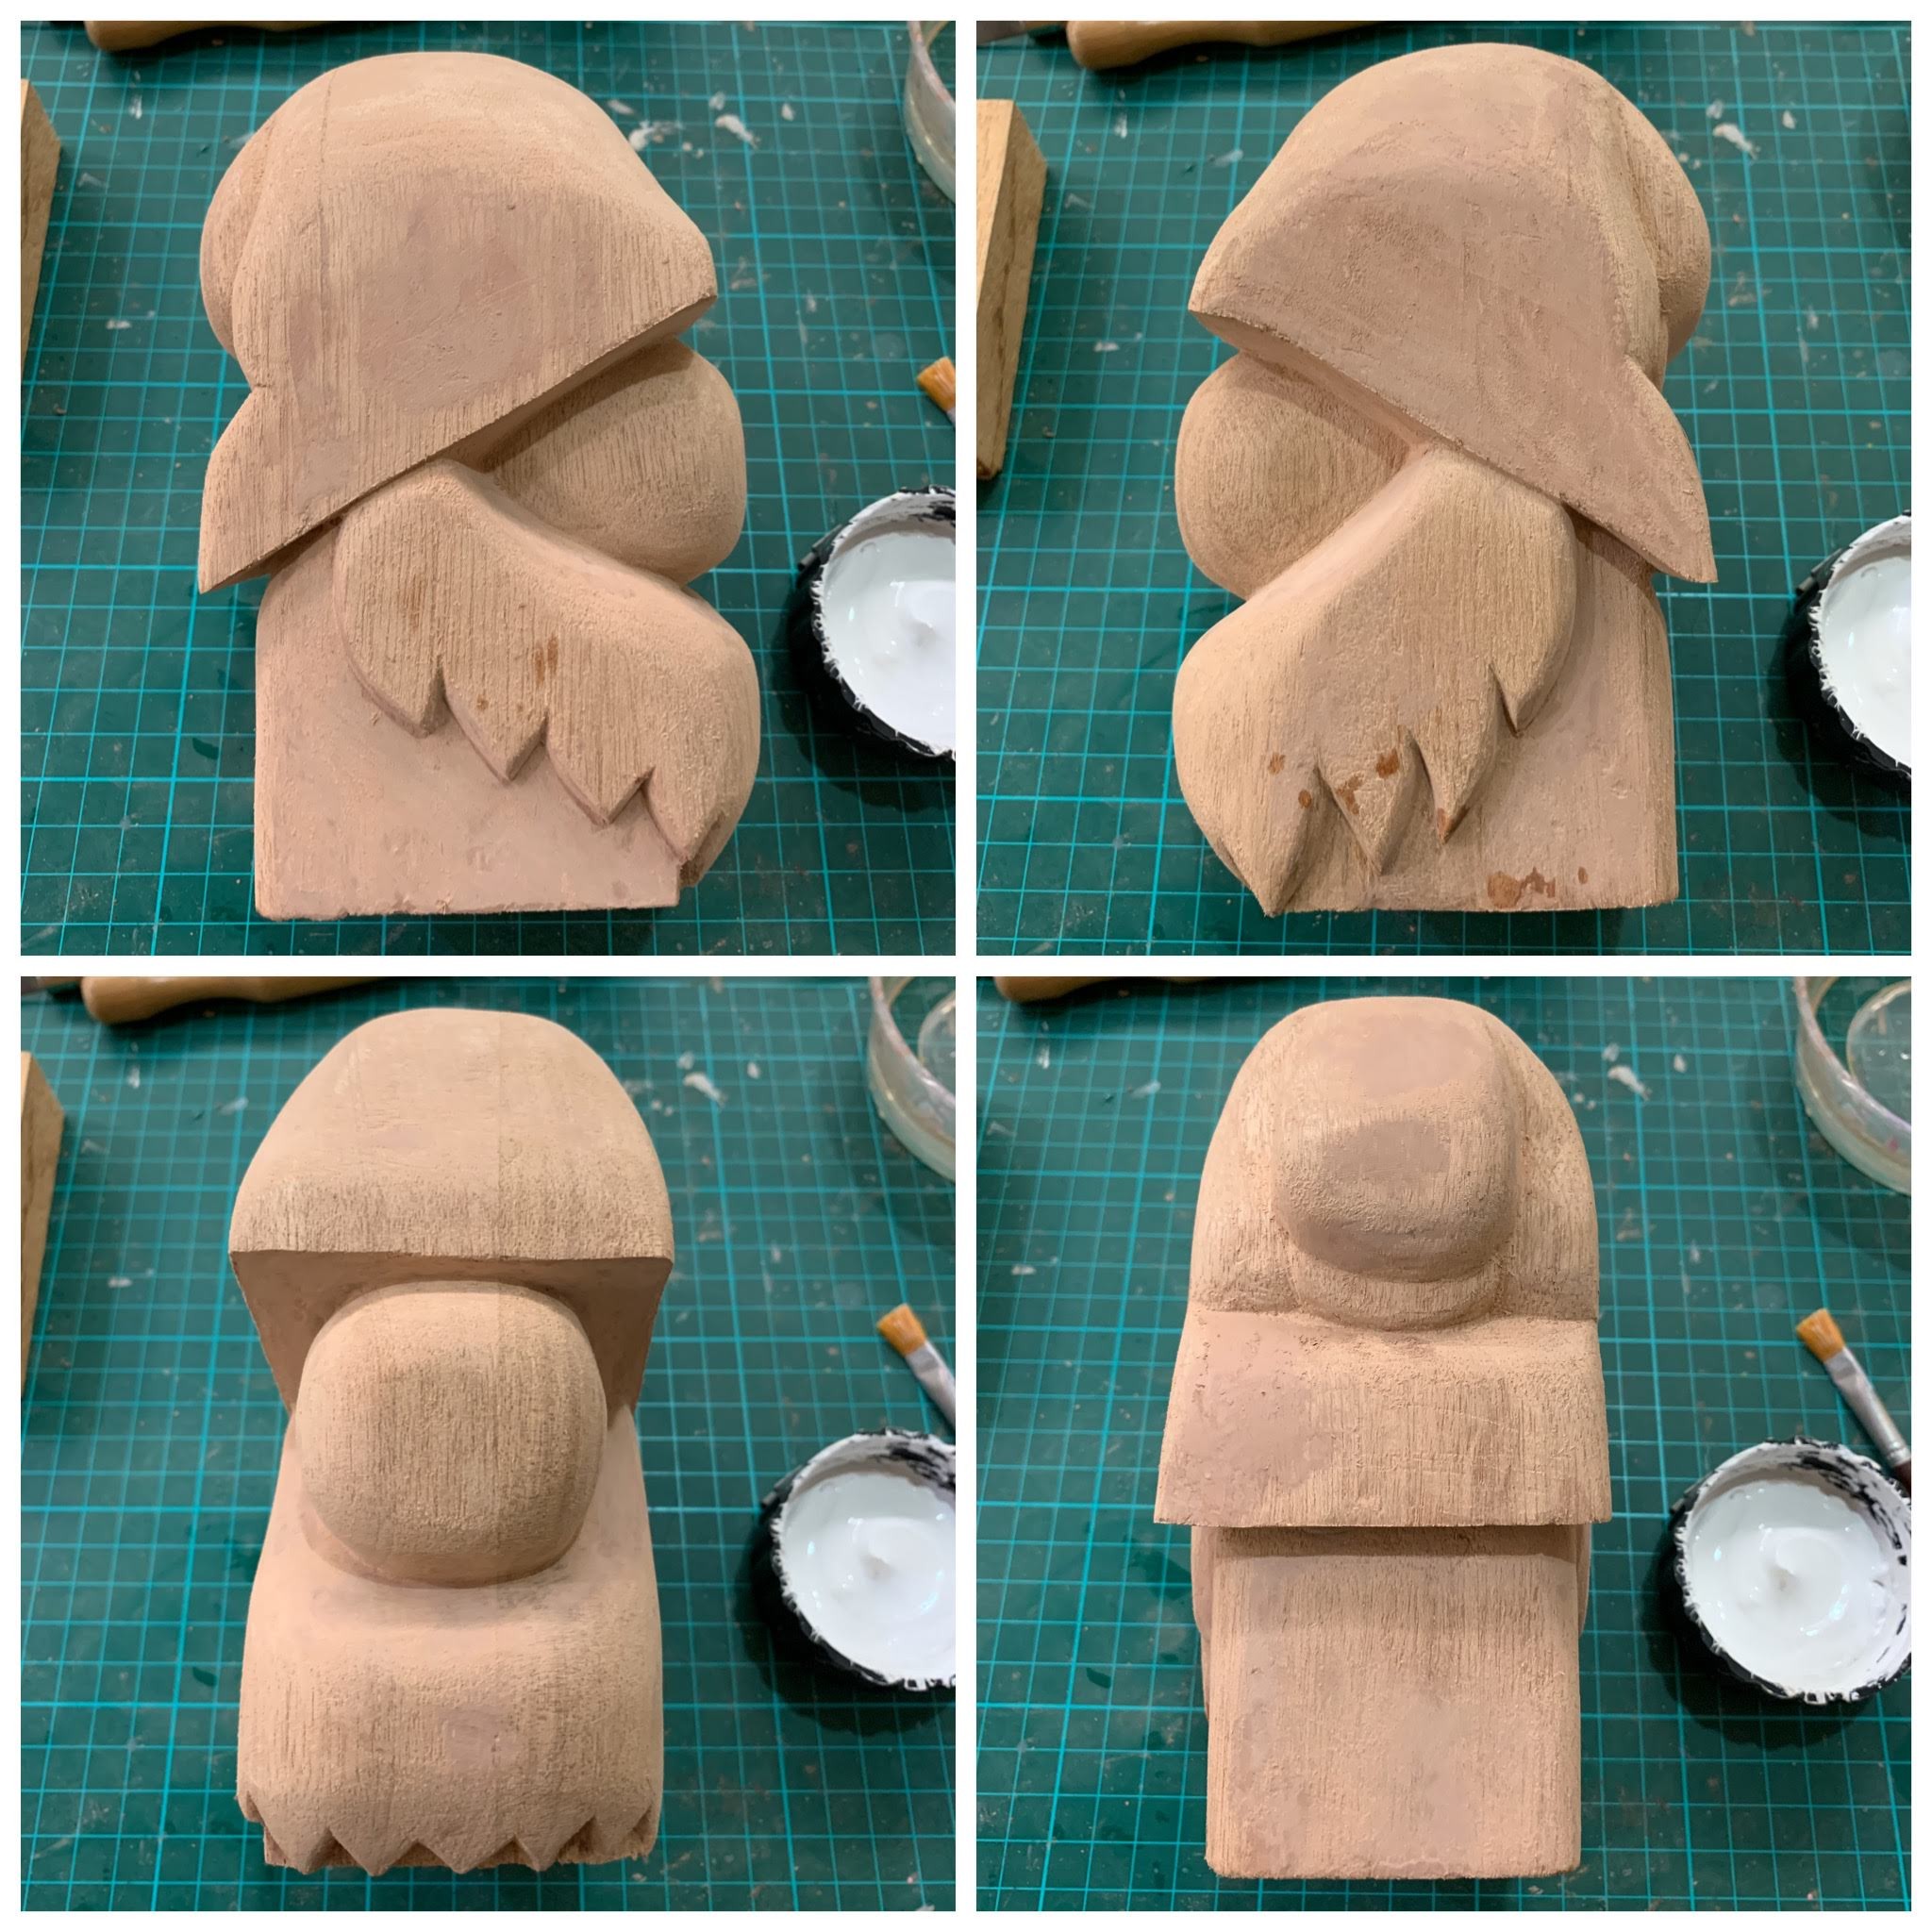
I’m at the tail-end working on ginormous Gnome. Despite all the imperfections, I’m rather pleased with the result. The homestretch to complete now is just sanding to fine tune the lines and putty work on the holes before the gesso and paint process.
I have stopped carving Whales for almost a month already for a couple of reasons. Number one reason being no more correct sized Meranti wood. However it’s not that I have zero wood supply anymore, it’s just that there’s a lot of odd-sized pieces. And it would be too tedious to trim to the size required.
Second reason being I wanted a change. With the 60th Whale (in total since the beginning) completed on 12 April, I felt like a factory, having carved a dozen of the same thing during the MCO (Movement Control Order) period.
So a week after Whale #60, I started on a new ginormous Gnome. But this totally new Gnome had a lot of ups and downs.
Plans to carve daily did not work out well as I had to juggle between cooking and design work. Throw in meal times and playing Homescapes, I simply did not have the luxury to sit down for a few uninterrupted hours to carve. And as work picked up too, this was far more important than all other activities. Hence progress on the piece was slow.
By the time I had the chance to sit and carve–and this would be by nightfall–I would be so tired mentally and physically, there’s no more energy left to even lift the carving knife.
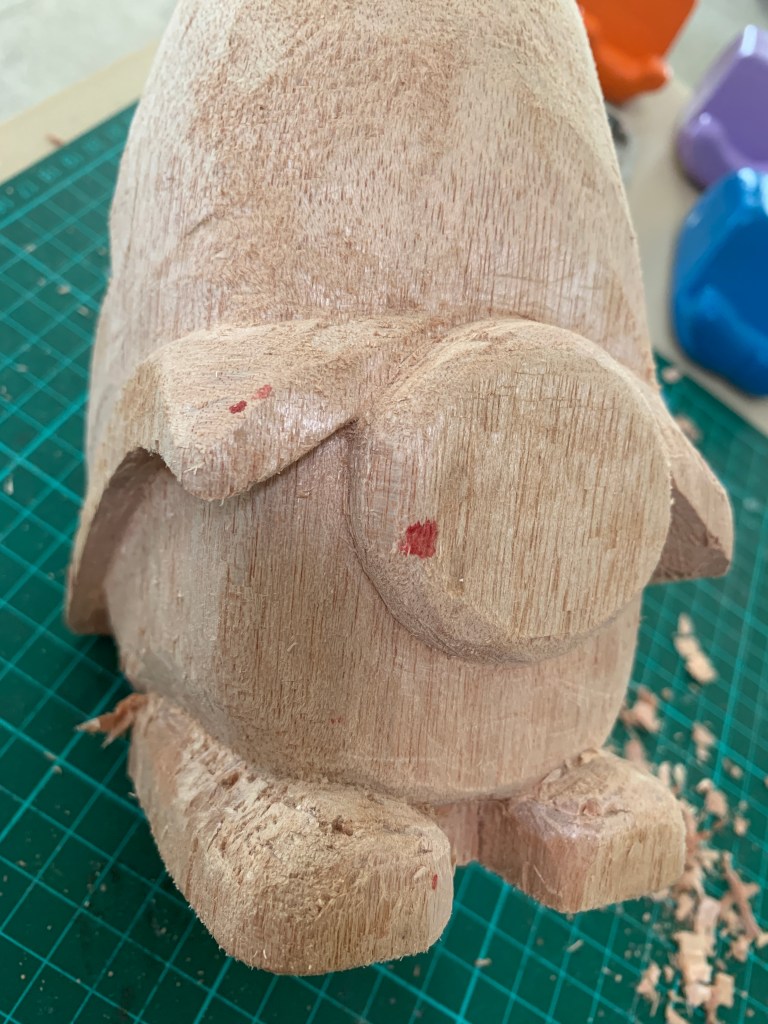
Then there were errors and hiccups working on the piece. The initial outline on the big two-piece Meranti block looked okay with a slight tilt of the cap but when I got down to it, not only was I off, I managed to nick my finger without realizing. The Gnome ended up with a very obvious lop-sided cap and a slightly bloodied nose. Oops…
The cap turned out too lop-sided!Sweat and blood stains
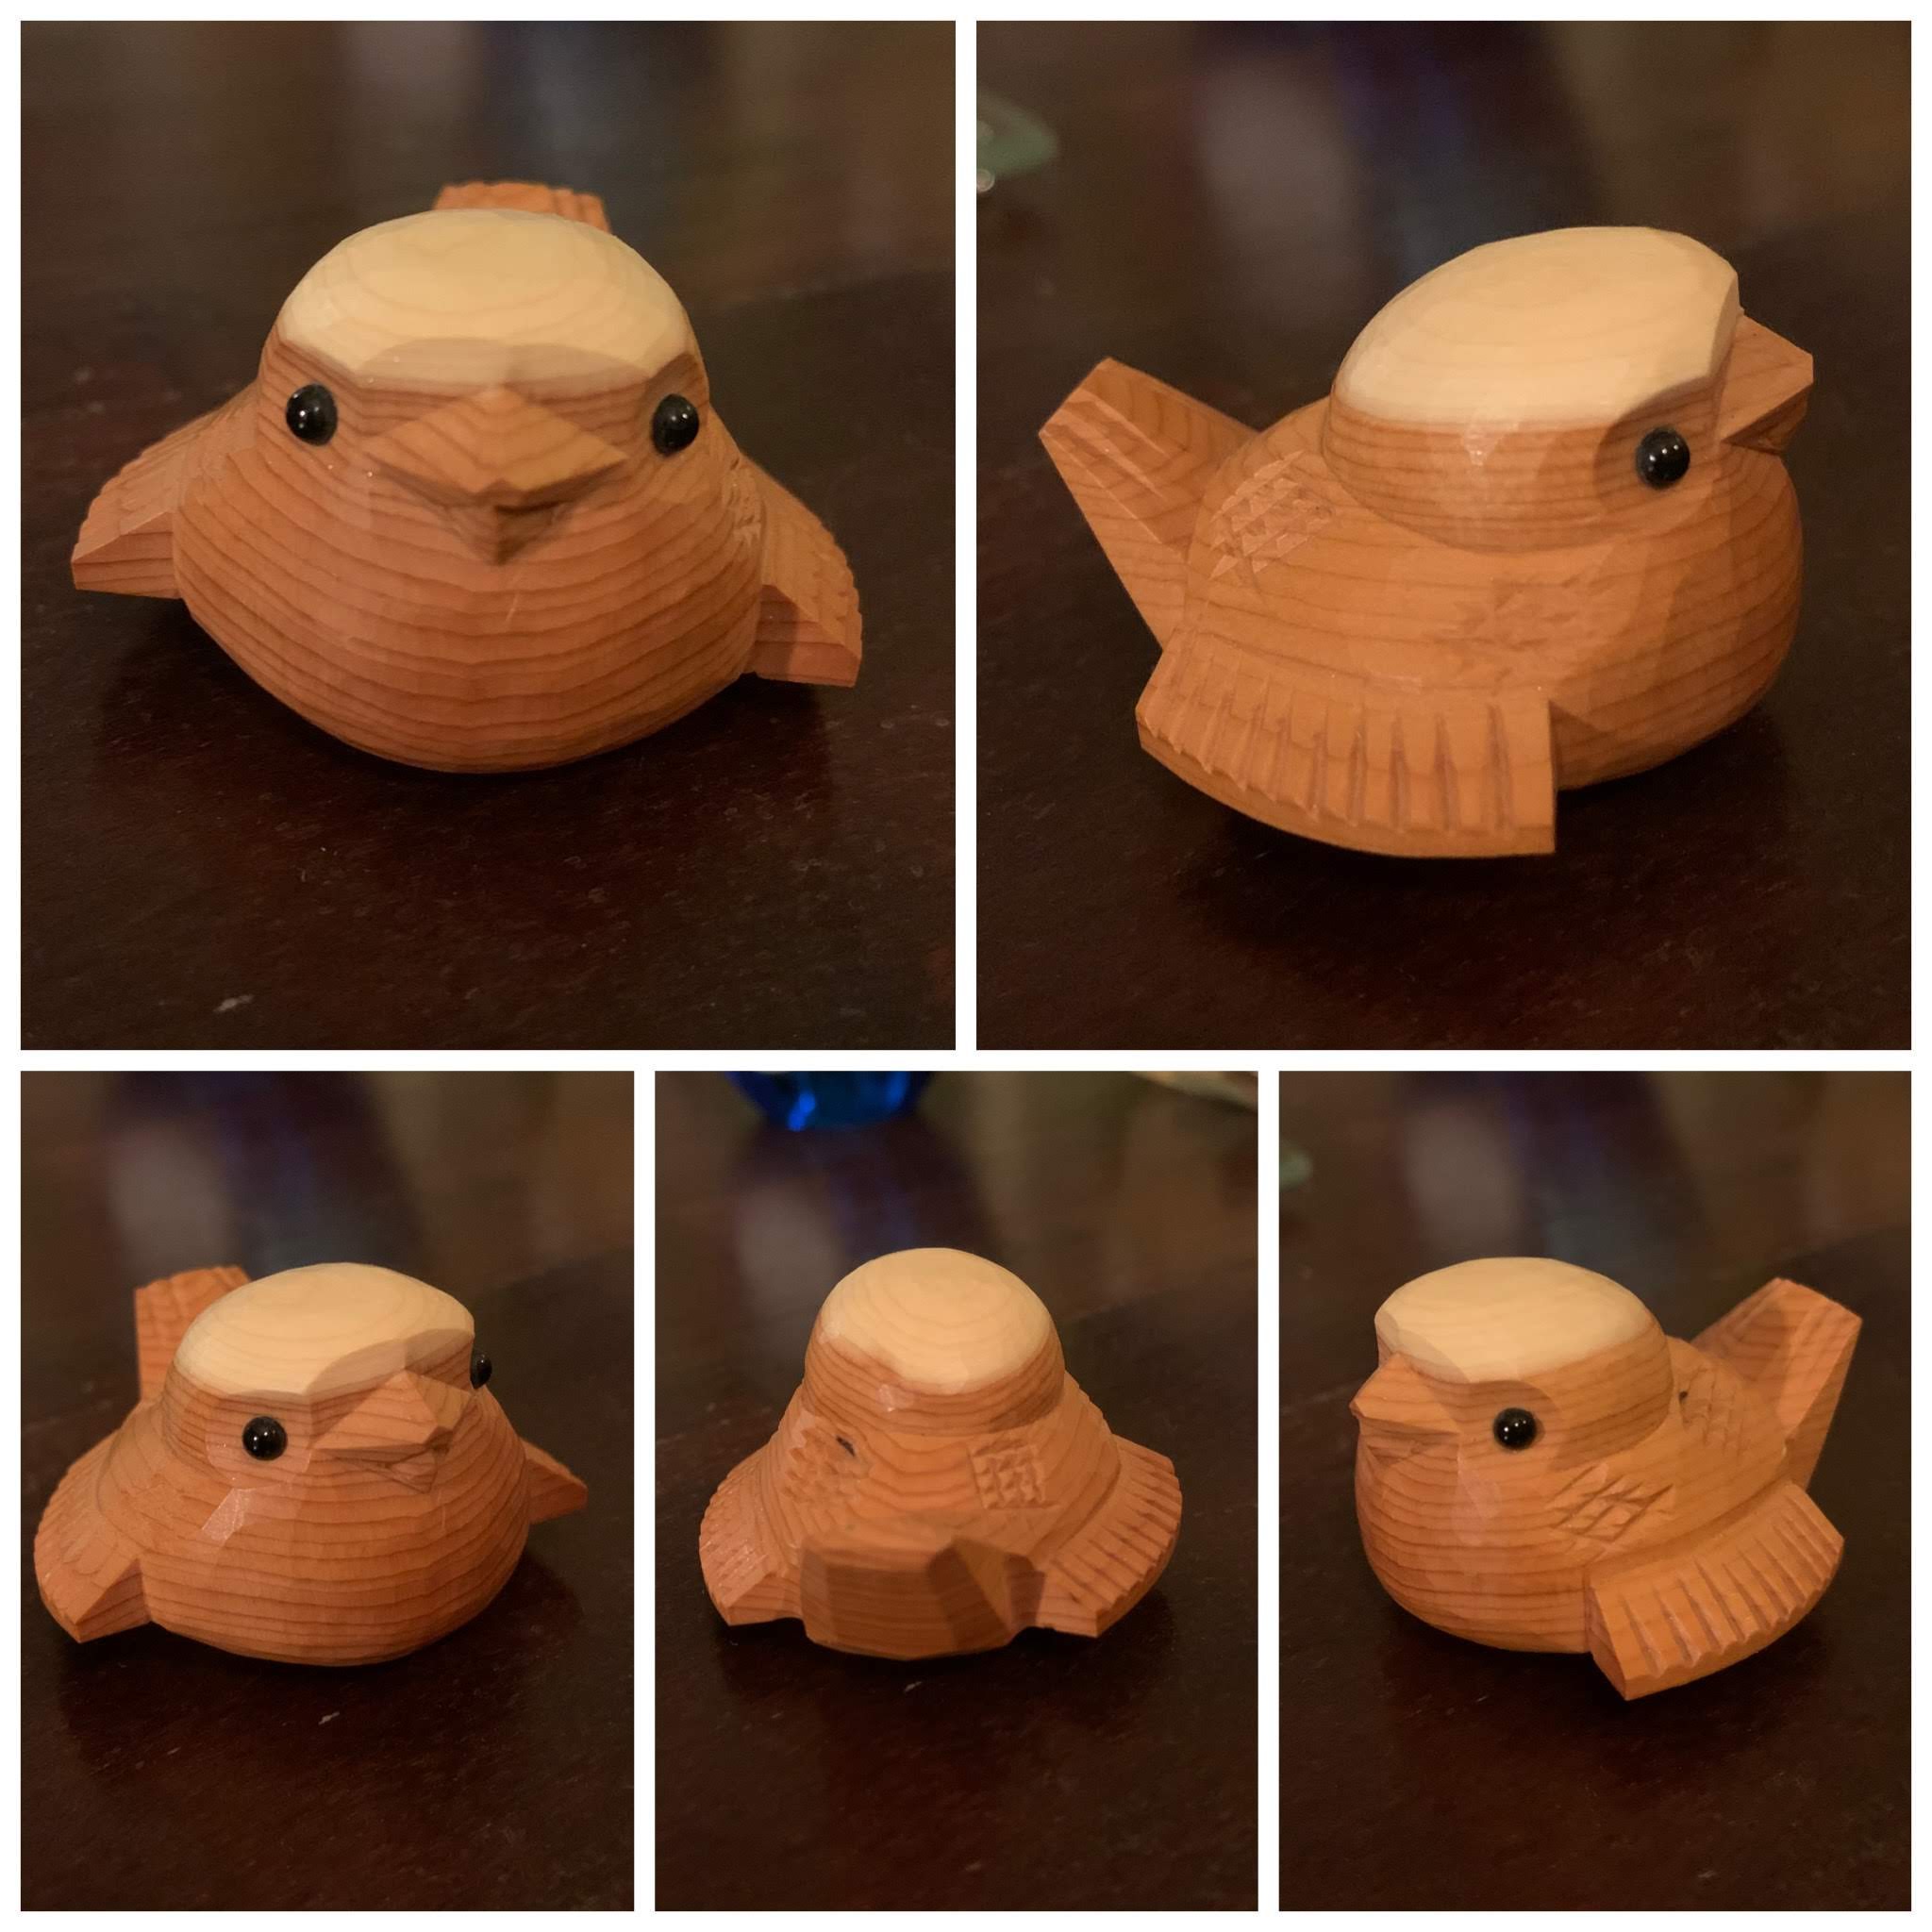
It’s not only a totally new Gnome but a totally new challenge as well. I thought the Little Birdy was tough, this one was equally if not more. But I ploughed on because I don’t have the correct sized wood for Whales.
Carving a new shape is not easy! Three months ago, I used the little birdie that my friend bought for me from Japan as my sample for a new shape to try. It was a real challenge in every aspect – the 3D visualisation and proportion before I even began carving and shaping the block of wood.
Even though I had all the measurements of the angles and sides, I was still off! Eeeks. Little birdie was without a beak because I miscalculated the allowance that would be shaped into its beak! At that point, little birdie looked nothing like a little bird at all. Hahahaha….
So a little surgery to add on and some putty magic to fix the problem, otherwise the whole effort would have been wasted! But the effort resulted in little birdie looking like a little duckie! Horrors… challenges after challenges.
Fast forward to the finished piece, little birdie looking like what it should be with a further reduction on the size of the beak. But now, after two months I am still stuck on how it should be finished, as in what color to paint instead of just leaving it in its gessoed state. Sigh… this new carving direction has not been easy.
It’s February already but I must say with the new year and new decade, I thought it’d be good if I embarked on new shapes to carve to expand my collection and ability.
Towards the end of last year, I was debating what I should carve next when my margarita partner sort of decided for me. She was in Japan (last year) and stumbled upon some cute figurines during her travel. And after several exchanges with me on WhatsApp, I decided on this cute little Yew wood piece from Takayama. It’s not cheap, let me tell you.
My carving/whittling skills have improved tremendously from my first piece to what I am able to do now. But I want to push myself further to do more challenging pieces. So cute little bird will be my mould to try. So stay tuned for the progress on this!
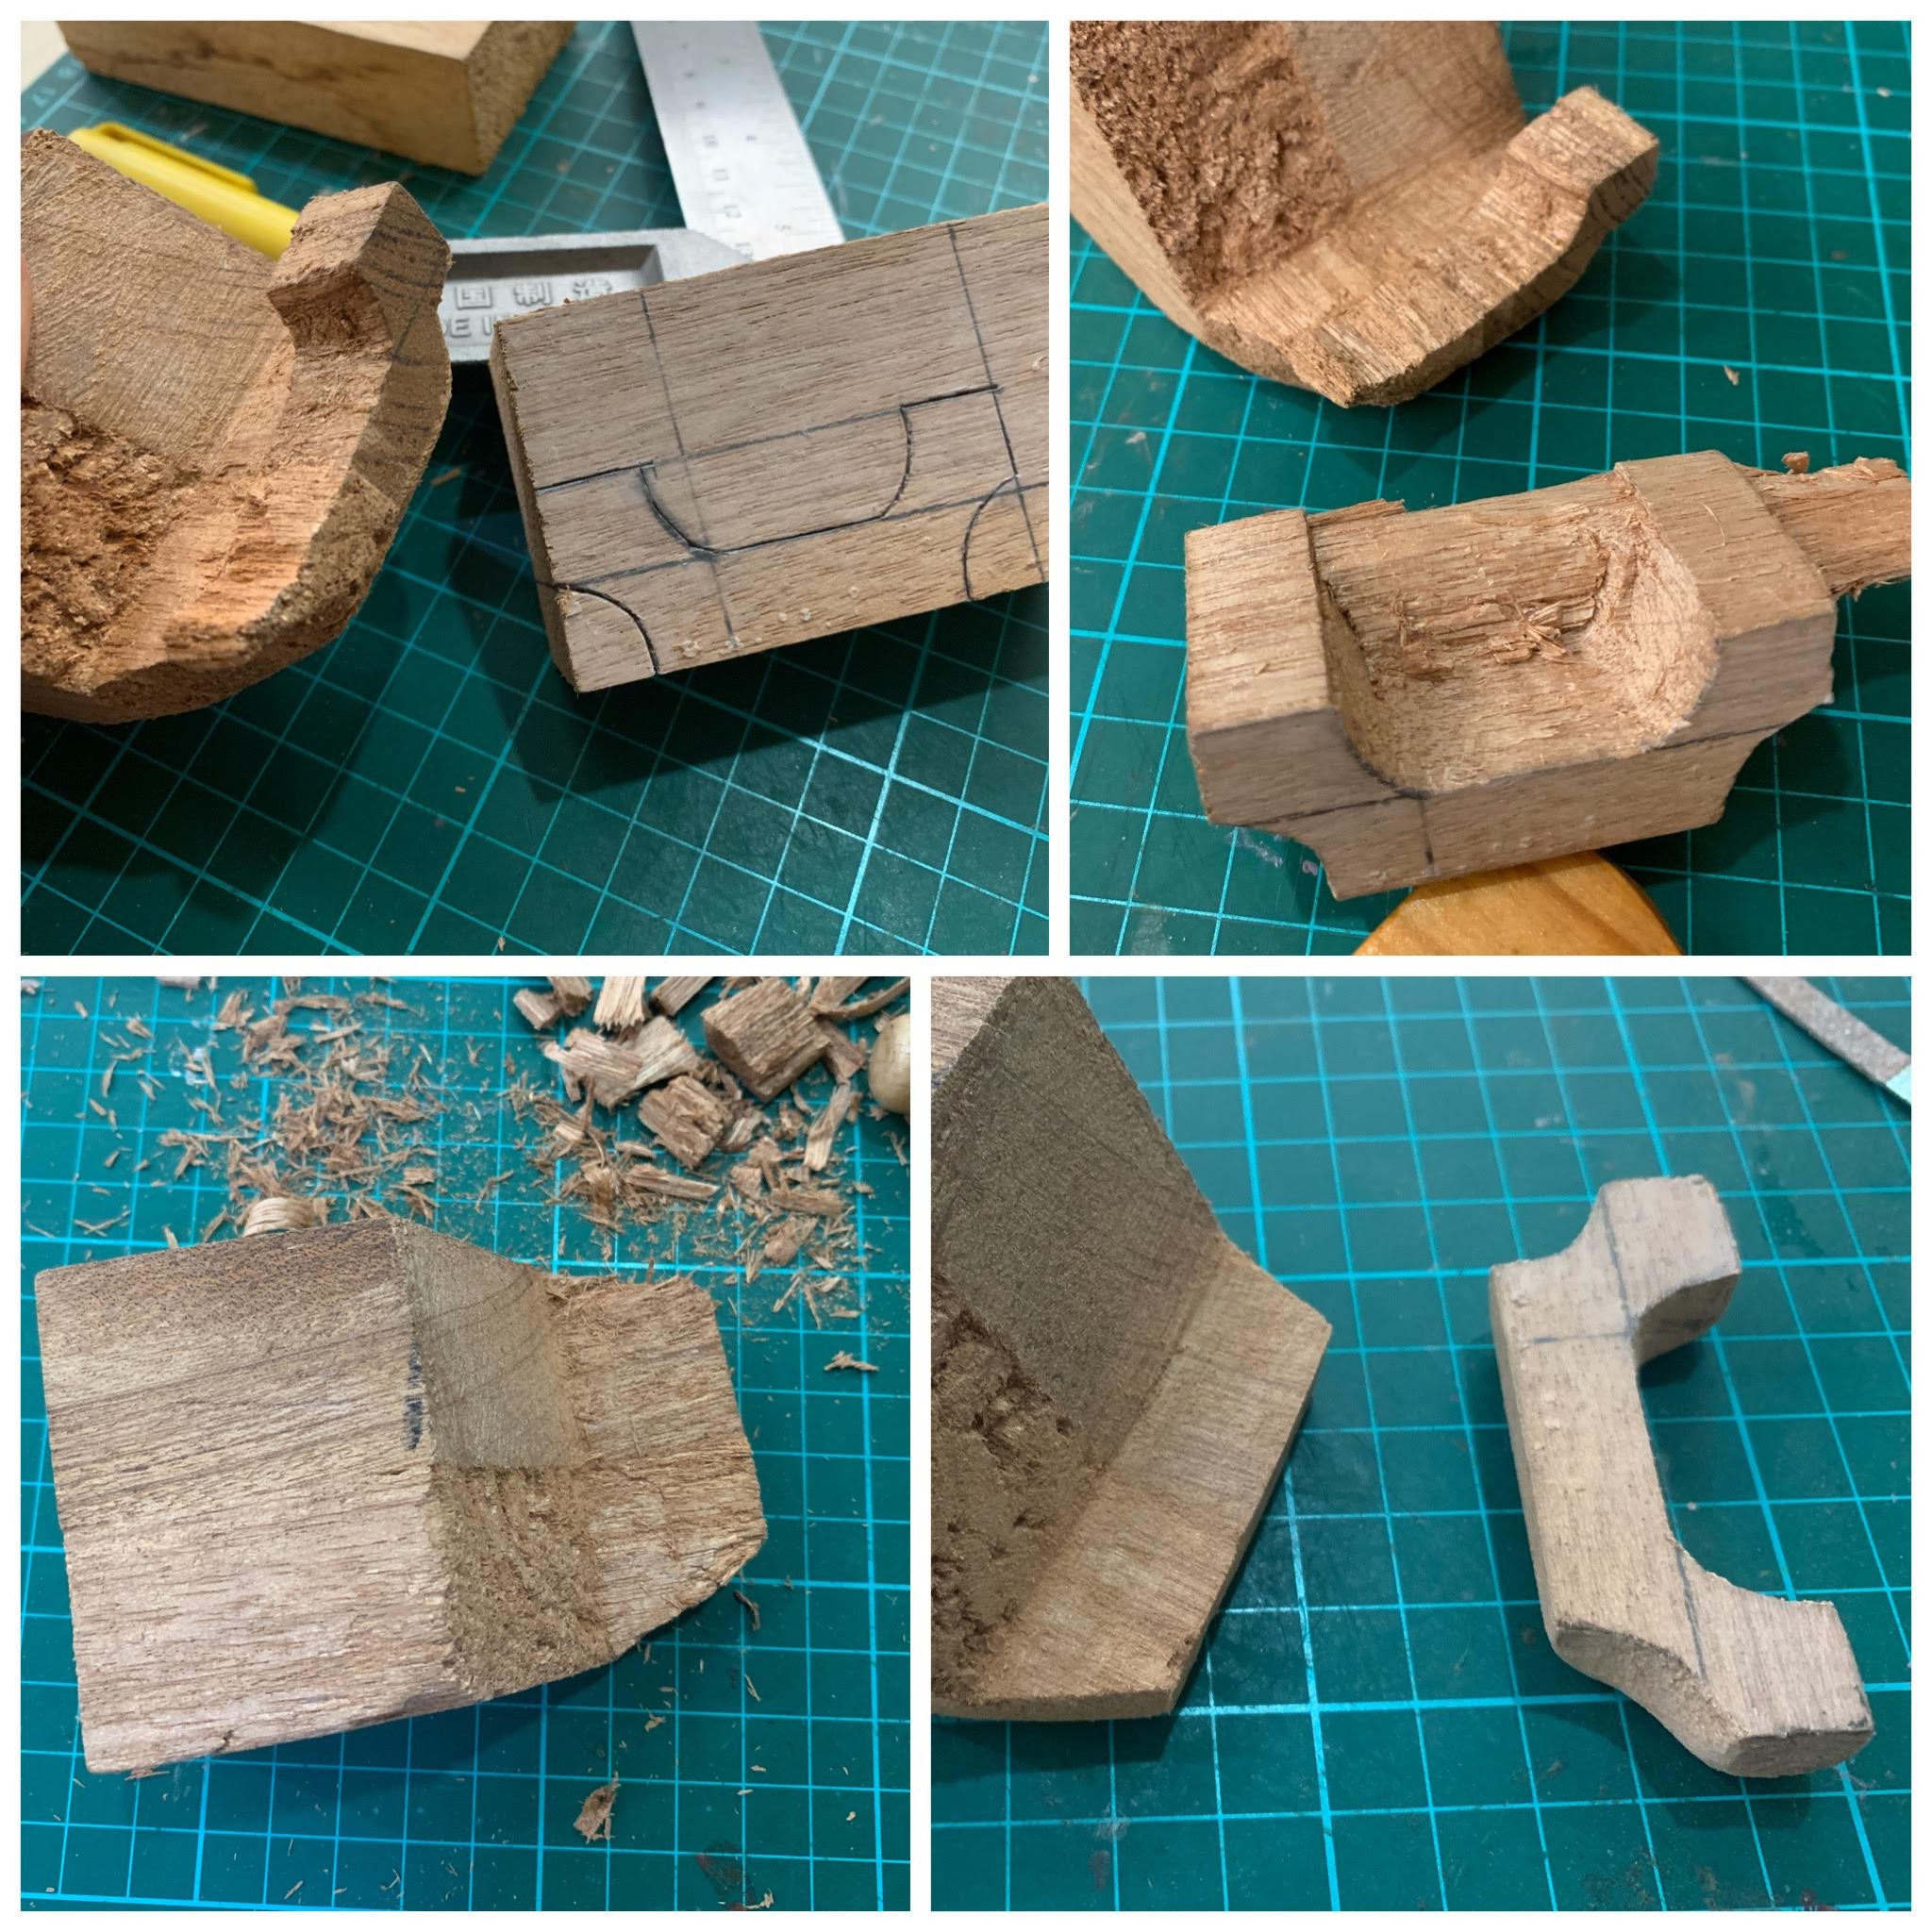
My MacGyver skills came in handy when it came to rescuing the Whale with the broken tail. Given a second chance to be completed and not abandoned, it would have a whole tail section transplant instead of an itty-bitty prosthetic!
This was what I did…
After evaluating the damage and the wood surface, an itty bitty prosthetic tail wouldn’t do because that part of the wood was too porous and it certainly won’t stick. It needed more to be permanent and a transplant was a better option to replace the whole section. A little bit more work but I felt better about this direction.
So I worked on another piece for the tail part. Luckily the Meranti piece that I chose wasn’t that hard and it was quite effortless to get the shape right quickly. But after aligning the pieces, my estimates were off! Haish… it didn’t look right and I ended up having to shave off a little bit more of the bottom part on the main body.
Bottom pics: Before (L) and after (R) trimming the base to fit the new tail section
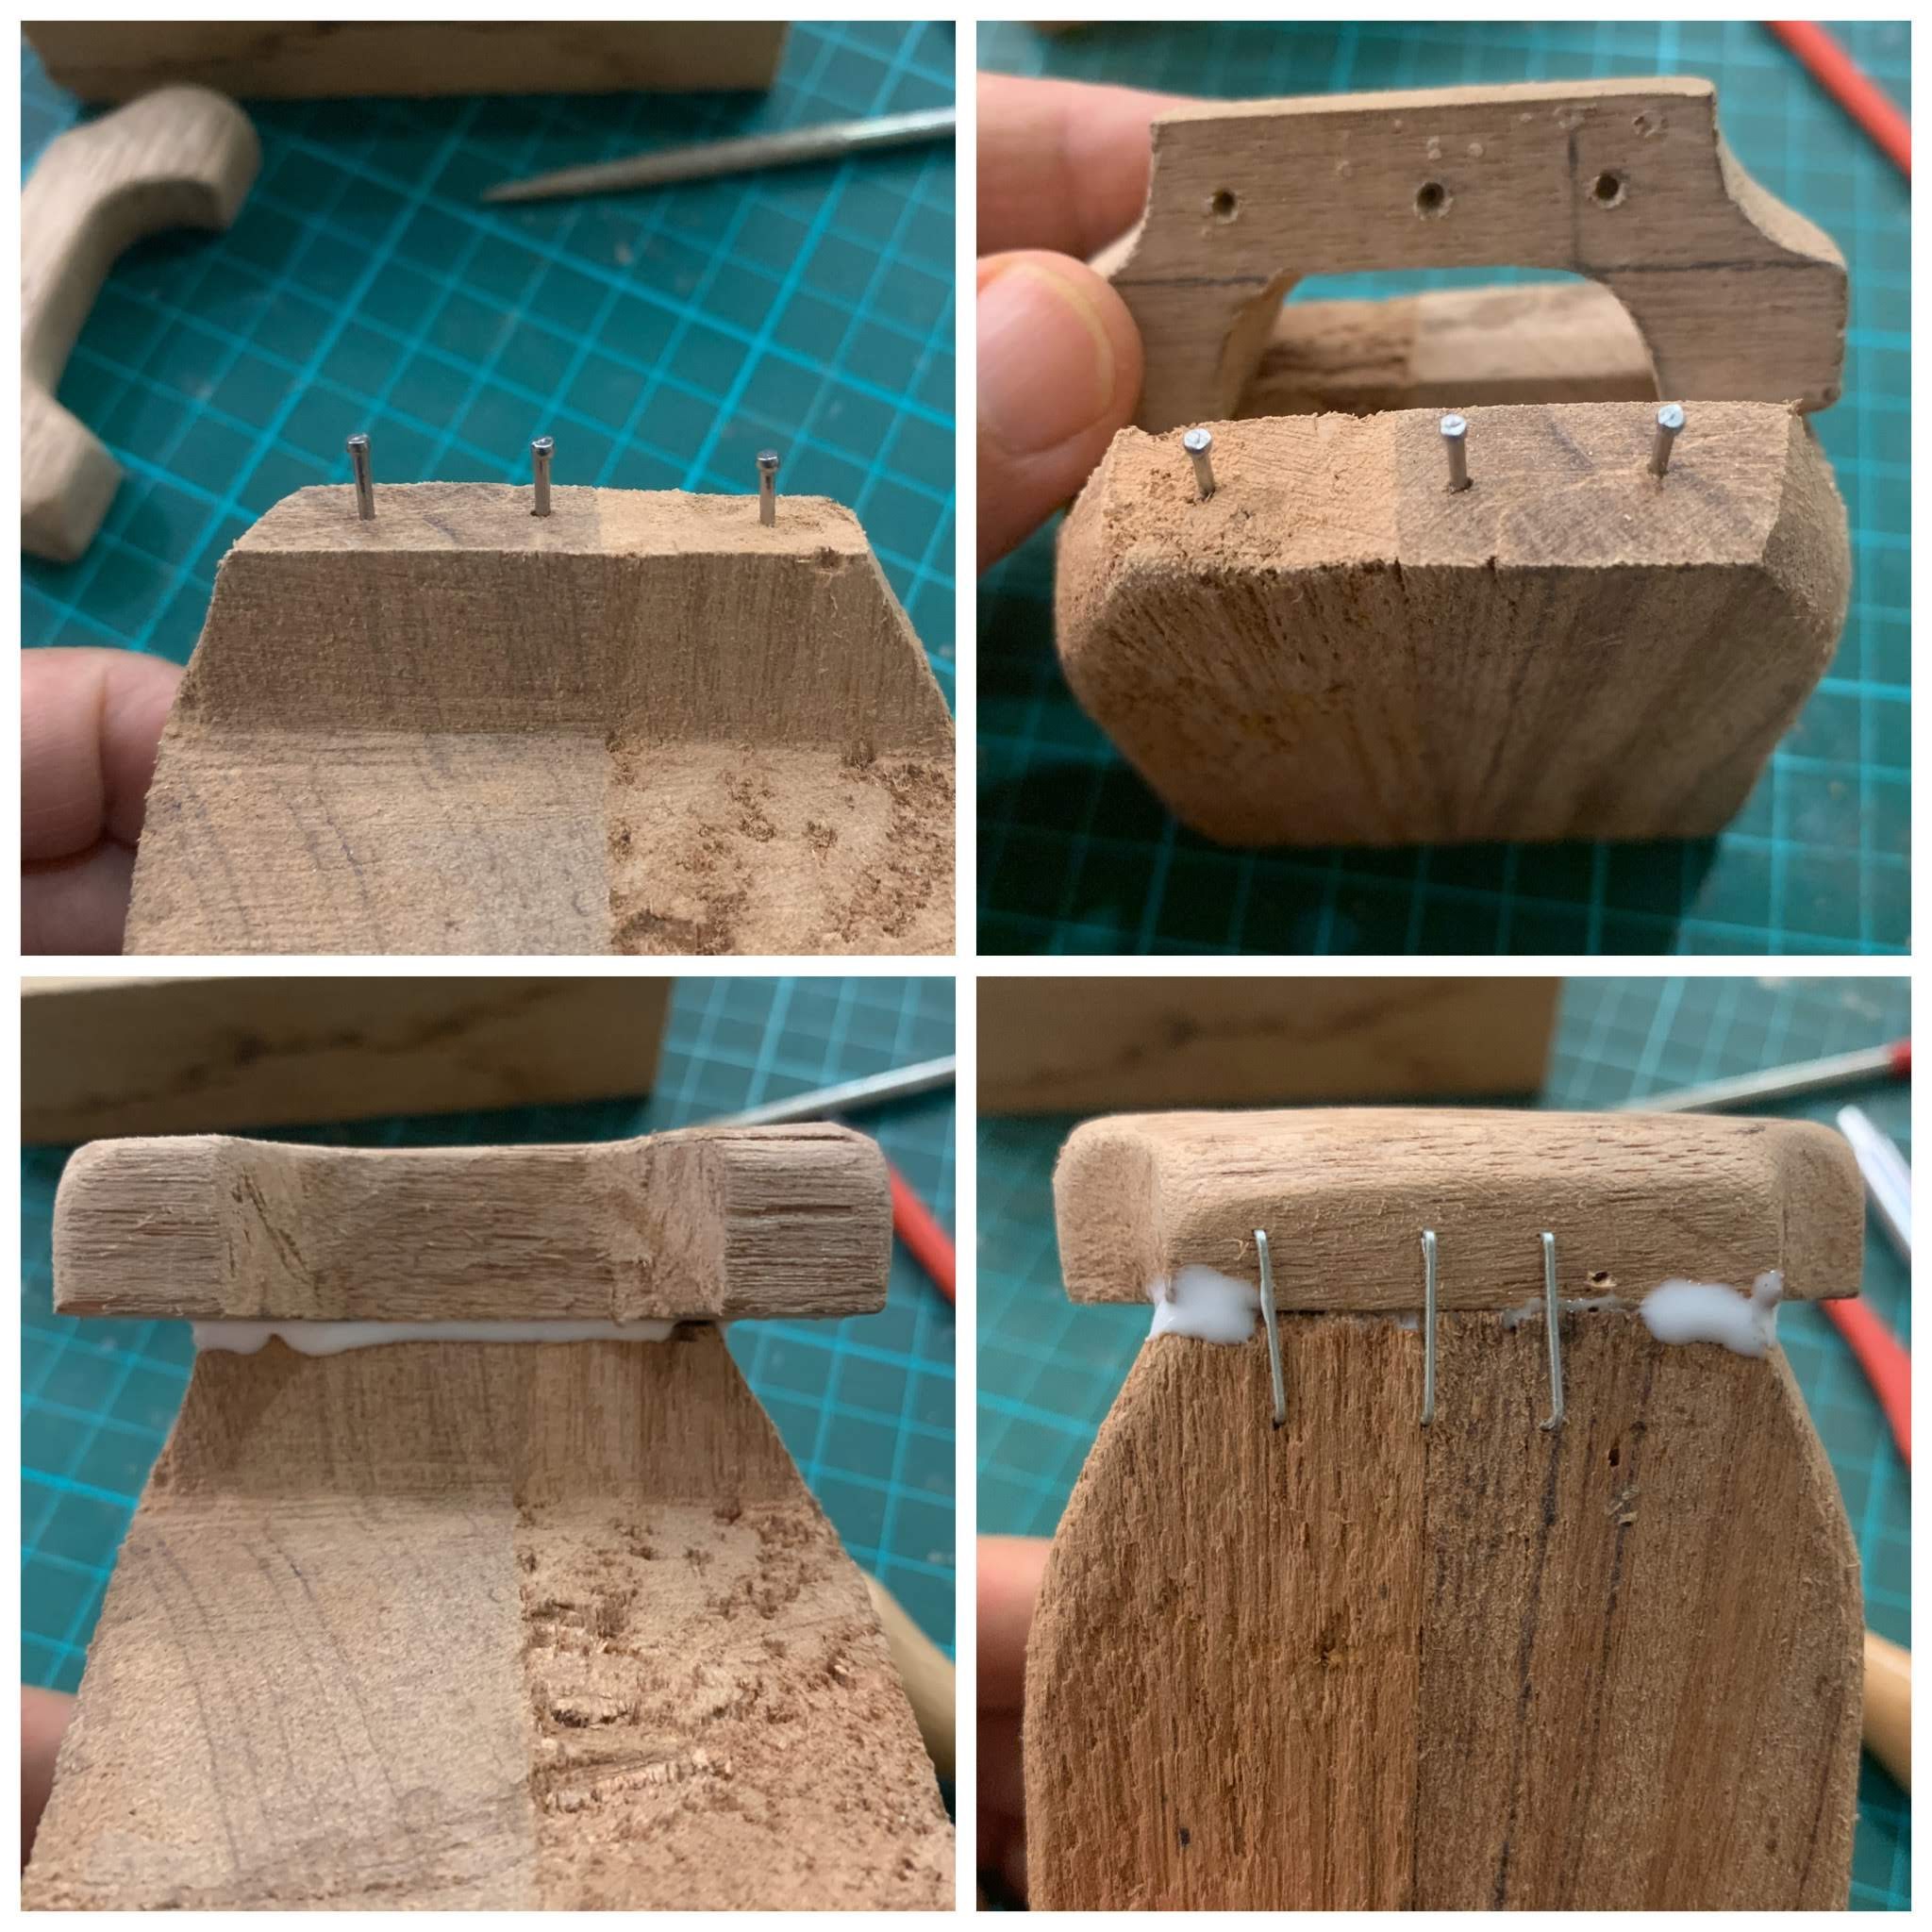
Eventually, with the tiniest nails I could find, the tail section was attached to the main body. I then added Elmer’s glue and stapled the section to secure it.
How to add a tail to a whale, with nails, glue and staples
After the glue dried, I started puttying the piece to even out the nooks and crannies and the Whale was starting to look good. Phew! I decided to leave the staples in for peace of mind.
A saved whale is a happy whale!
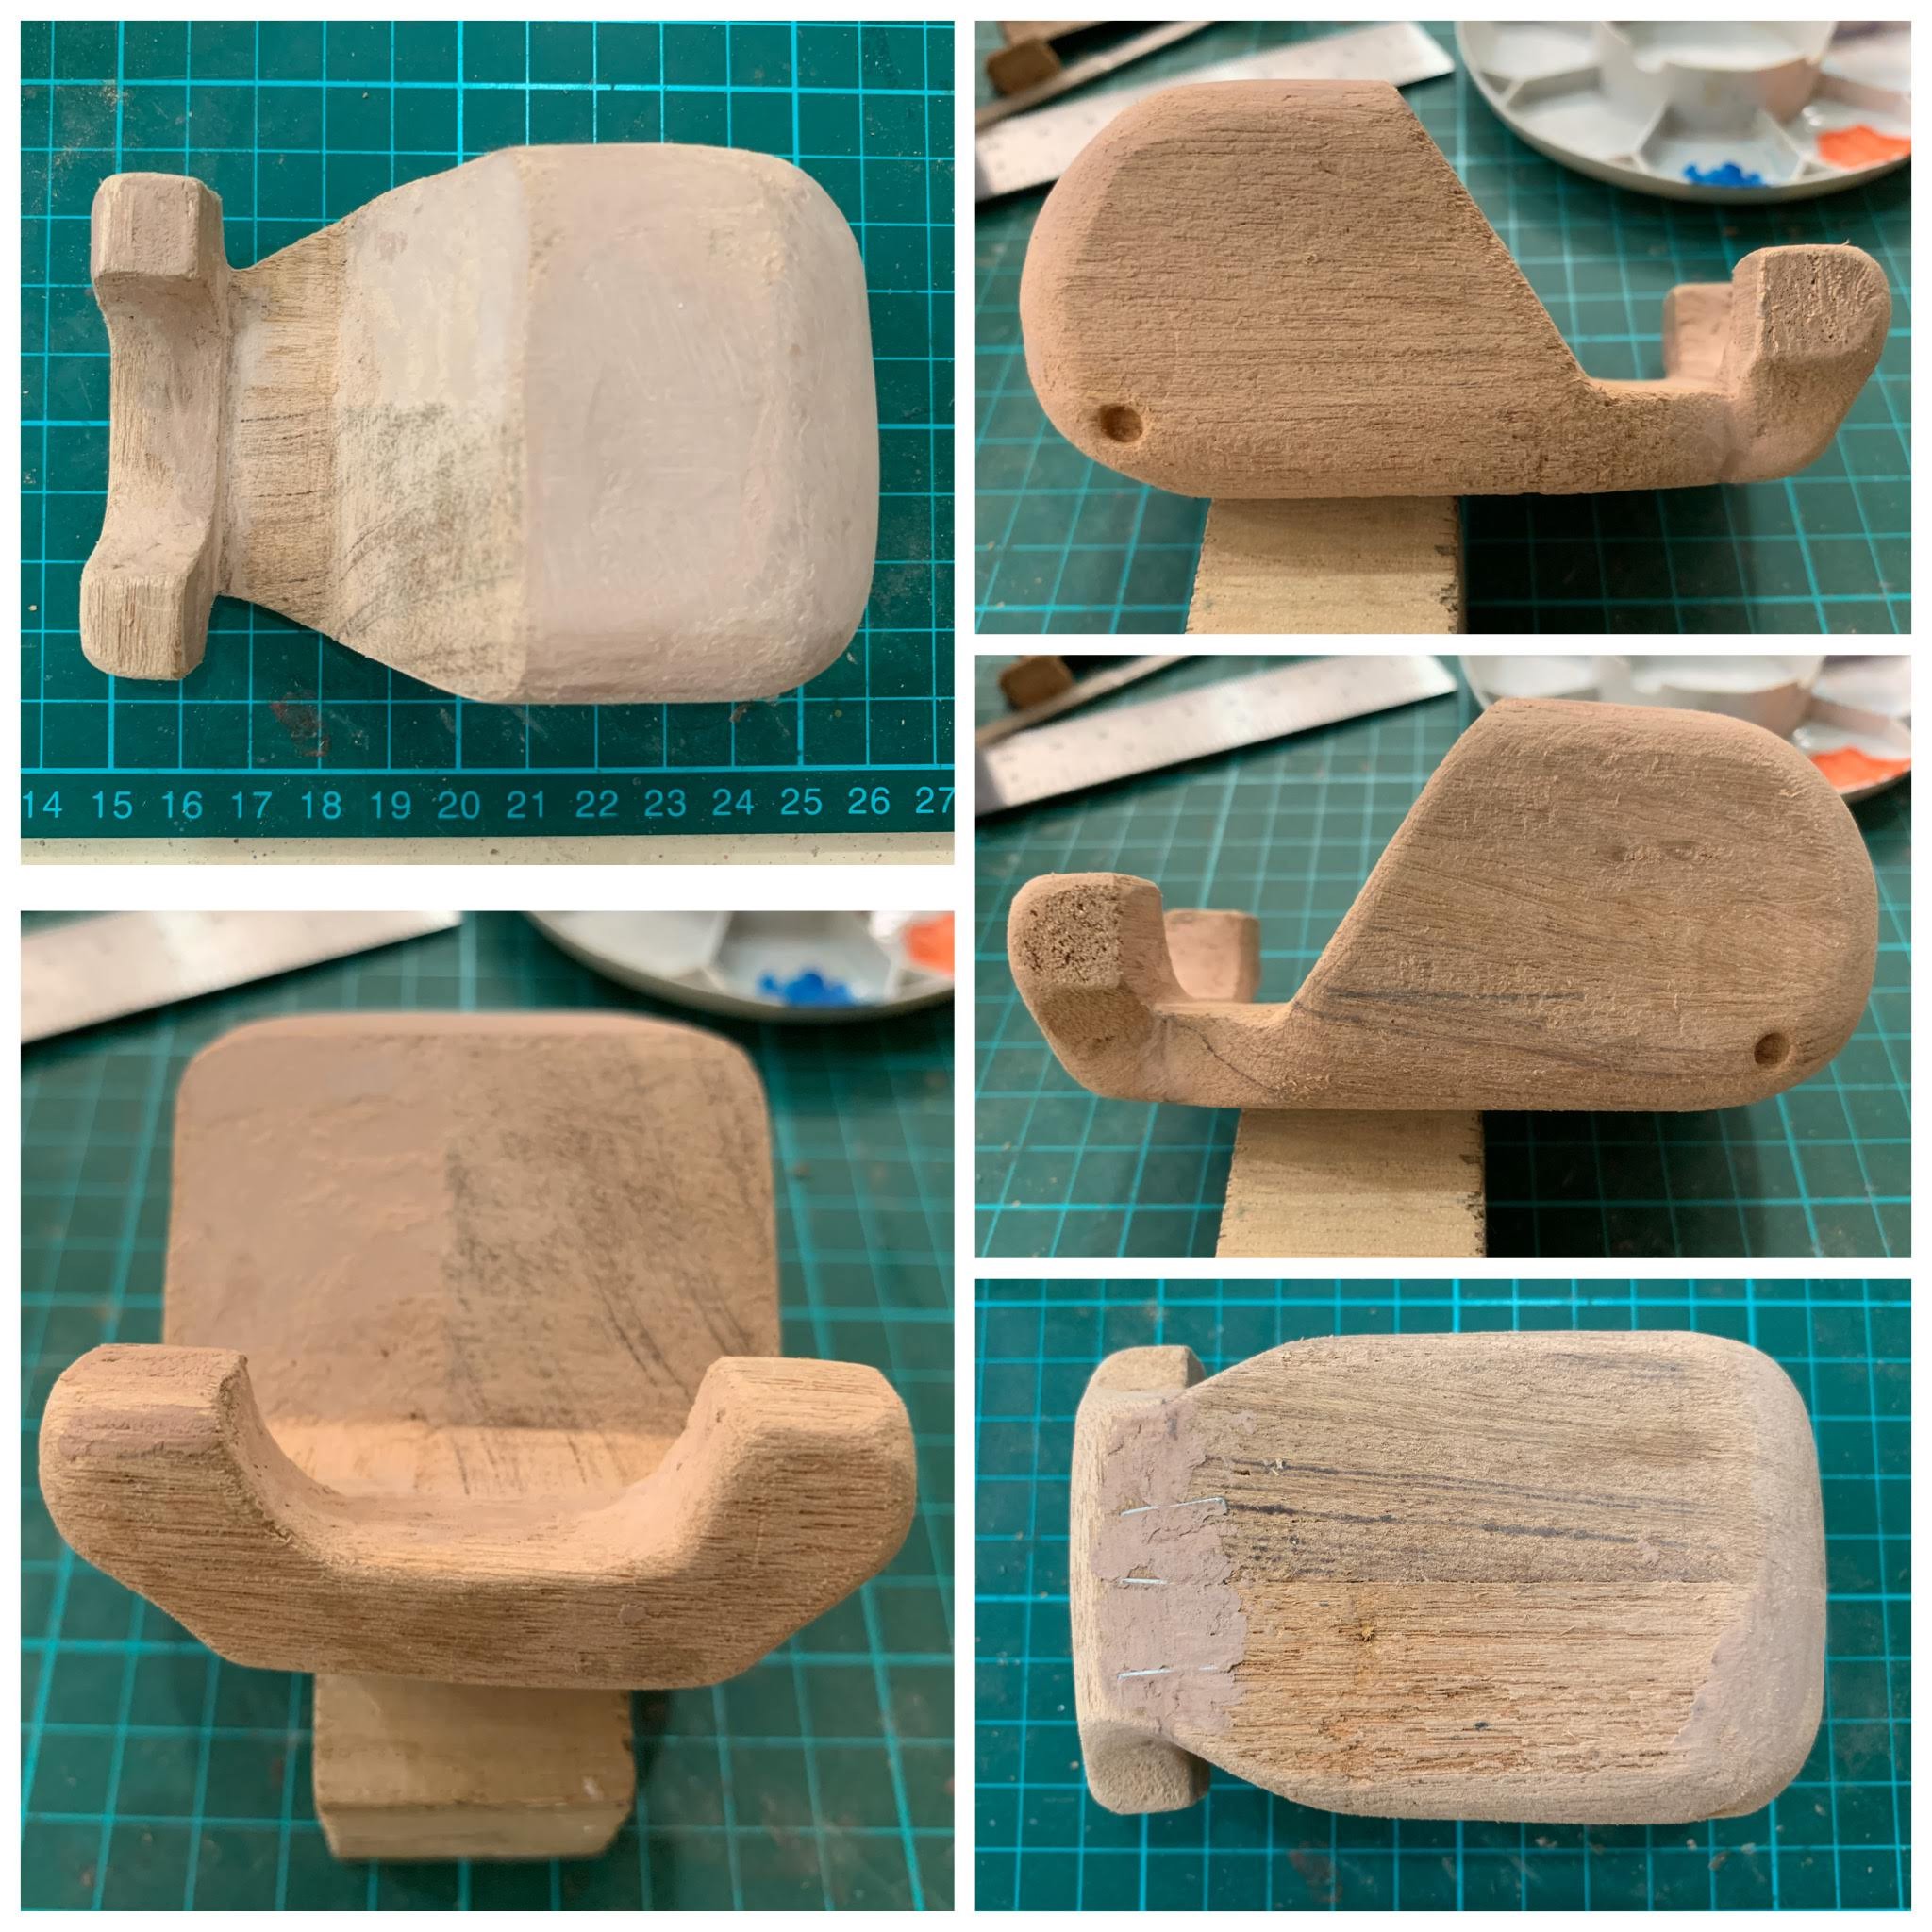
When I’m done applying gesso on it, you can’t tell that this fella had surgery in the first place. And once I decide what color it shall be, it will certainly look good when painted. I’m so glad I persevered on this to give it a second lease in life after that unfortunate cut that was too deep. A saved whale is a happy whale, and a happy me too!
After completing Ginormous Gnome the Second, I moved to carving a Whale. Somehow for this piece, I had reservations when I started but I did not take heed. The two pieces of Meranti were different – one was too hard and the other too soft. I don’t know what I was thinking when I glued them together. I decided to go ahead to carve out the usual.
It wasn’t easy because one side being so soft, created a lot of craters when I worked on it. I didn’t even exert any strength and it would break. But the other side being so hard, I had no choice but to exert strength and this inadvertently hurt my elbow. Sigh… and I didn’t want to abandon the piece, so I ploughed on.
And then this happened – the tail broke off… Arrrghhhh!!!! I was aghast! What have I done?
The soft, the hard and the broken…
The piece was on lying on the softer side when I was shaping the harder side of the tail. But it was a cut too deep and the pressure broke the softer side of the tail.
Instead of abandoning the piece by now, which I was still reluctant, I thought a little prosthetic tail can perhaps save the piece. I felt that I have put in so much effort up till now, I didn’t want to give up.
How to salvage this fella? I had to plan and devise a rescue mission.
Ginormous the Second looks better from the side than the front
I’ve finally gotten around to painting up Ginormous Gnome the Second. And I must say it does look good especially from its side profile. Compared to Ginormous the First, the difference in body width is very obvious. I think if I have two blocks of the exact same size, both pieces would still come out slightly different.
As every piece is hand-carved, there’s bound to be some variation, subtle or obvious that gives each piece their unique character. The end result of both looking the same is only in terms of the overall shape and colors.
I’m pleased that the second piece turned out good and preparations are underway to start the next gnome soon.
Side by side, Ginormous 1 and 2 are very different in size!
The efforts on Ginormous Gnome the second has been coming along fine. My only problem with it was its width – a wee bit skinny. It actually looks fine from the side profile angle but from the front, a tad too thin.
The nose job was tough!
Putty added to smoothen the surface throughout
The nose was the biggest challenge for this piece despite it being one piece unlike Ginormous One, which had an add-on. And since the overall body was rather skinny from the front, the big nose had to be shaved down to be proportionate to the body.
A lot of work but at the end, I’m pleased with the result. Once it’s painted up, another excellent Gnome to be displayed with the rest. Or I could give this fella away? Hmm…
Looking good from the side with gesso applied as base before painting it up!
Looks like there may be more giant Gnomes coming up considering I have recently gotten new supplies of wood. Yay!
After the bout of carving six Citizens not too long ago, I was ready for another big piece. Suddenly carving big pieces is the way to go! This latest attempt at another Ginormous Gnome is again a combination of three Meranti wood, making it the second piece with three glued pieces.
This time there’s no add-ons for depth, learning from the previous piece. Also I am unfazed by the height because I know what to do. And there certainly won’t be any hole in the cap because I sketched the Gnome to be smaller with plenty of room to shape.
Let the carving begin!
These days I seem to prefer carving big pieces over little Gnomes as it does not aggravate the left wrist because I don’t need to have a dead grip with the left hand. If you must know, carving Citizens is not painful because it’s on soft balsa, not semi-hard Meranti wood.
But I still have to find the right balance with this new direction because at times, the right golf elbow can still be aggravated if I’m at it too long – the repetitive motion on the semi-hard Meranti.
Sometimes if I have a weekend game coming up, I’d carve less to prevent any recurrence of pain. However if the pain persist on game day, I have no choice but to pop painkillers and use Salonpas patches to subdue it.
Perhaps with the new lighter golf set making golf enjoyable again, I can find the middle ground to have satisfaction to enjoy both golf and carving simultaneously without giving up one or the other.
I’ll see how, until then onwards with the new piece!


Remarks